
紙の資料をデジタル化して管理することを考えた場合、その次に行う作業は、分類して整理することです。資料が少ない場合は1枚づつ読み込みと同時に分類できますが、数千枚や数万枚に及ぶ資料になると、そうもいきません。
そこで、今回は、「画像の一部」着目し、その部分を使って分類する方法を紹介します。わざわざ深層学習(ディープラーニング)を使って学習させずとも、OpenCVとOCRのモジュールで実現できますので、是非一度お試しください。
今回の内容
大量の過去スキャン画像から、特定の特徴を持つ領域を検出し、それに基づいて画像を自動的に分類することを目指します。これにより、手作業での分類にかかる時間と労力を大幅に削減し、情報の整理と検索を効率化します。
今回の手法は、下記のケースで応用できます。
- 手書き領収書:
金額、日付、品目などが手書きで記載された領域に着目し、「領収書」として分類する。 - 設計図:
特定の記号(バルブ、配管、寸法線など)、図枠、注記領域などに着目し、「機械設計図」「電気配線図」「建築図面」などの種類を分類する。 - 部品リスト:
表形式のレイアウト、部品番号、数量、品名などの文字列パターンに着目し、「部品リスト」として分類する。 - 技術仕様書:
特定のキーワード(「性能」「仕様」「材質」など)、表形式のデータ、図表のキャプションなどに着目し、「製品仕様書」「試験報告書」などの種類を分類する。
テストデータの準備
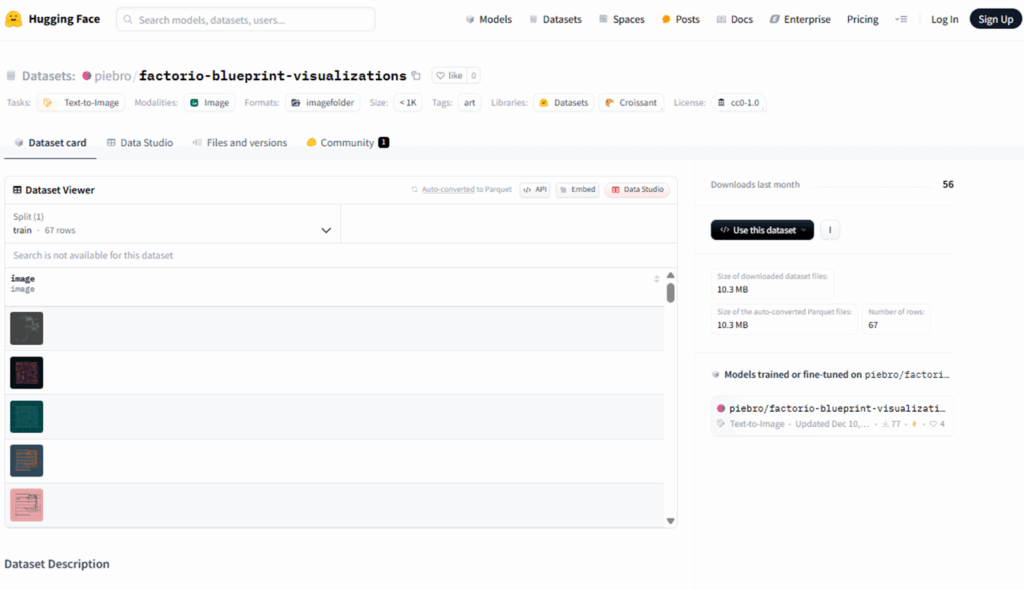
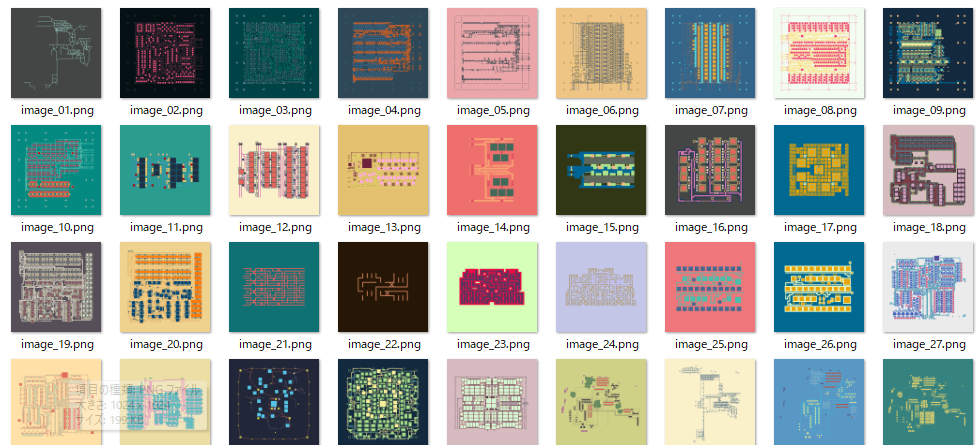
HuggingFaceで公開されている1024×1024の画像をテストデータとして使います。load_dataset関数で簡単にダウンロードが可能です。
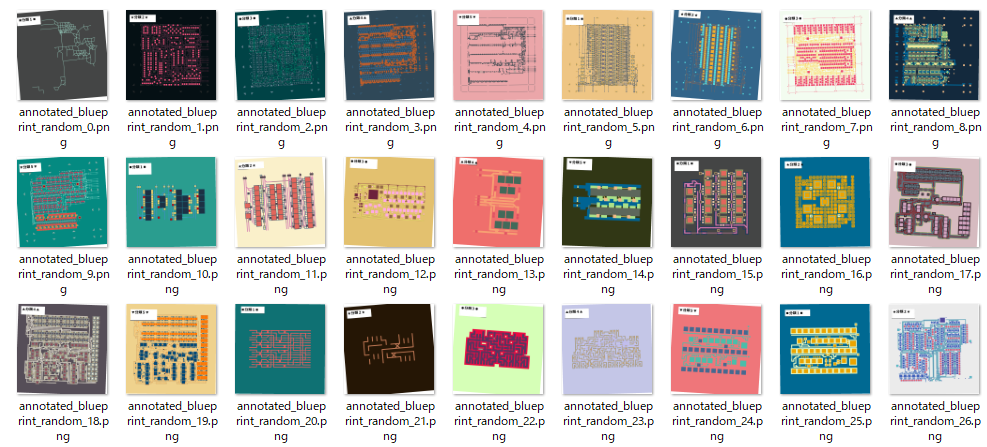
今回は、このテストーデータに対して、左上に識別したい文字列を埋め込む処理を施し、最終的なテストデータを完成させています。
プログラムの実行に際しては、pip で datasets をインストールしておいてください。
pip install datasets
下記がテストデータをダウンロードし、識別用の文字列を埋め込むプログラムです。
7行目はテストデータの保存先フォルダです。ご自身の環境に合わせて適宜変更してください。
import os
import random
from datasets import load_dataset
from PIL import Image, ImageDraw, ImageFont

# ★★★★ 出力ディレクトリの作成 ★★★★
output_dir = "p:/annotated_factorio_images_random"
os.makedirs(output_dir, exist_ok=True)

# データセットのロード
ds = load_dataset("piebro/factorio-blueprint-visualizations")
train_ds = ds['train']

# 埋め込む文字列のリスト
texts = ["■分類1■", "★分類2★", "●分類3●", "▲分類4▲", "▼分類5▼"]

# 基本パラメータ
base_rect_position = (50, 50, 300, 150) # 四角形の左上の座標、右下の座標
base_rect_outline_color = 128           # 四角形の枠線の色(グレースケール値)
base_rect_line_width = 5                # 四角形の枠線の太さ
base_font_size = 40                     # 四角形の中に書くテキストのフォントサイズ
font = ImageFont.truetype("C:/WINDOWS/Fonts/MEIRYOB.TTC", base_font_size) # 使用するフォントとサイズ
text_color = "black"                    # テキストの色(黒)
bg_color = "white"                      # テキスト背景の色(白)
base_text_position_offset = (10, 10)    # テキストを描画する際の、四角形の左上からのオフセット(X方向、Y方向)

# ランダム変動の範囲 (調整可能)
rect_x_offset_range = (-20, 20)         # 四角形のX座標のランダムなオフセット範囲(最小値、最大値)
rect_y_offset_range = (-20, 20)         # 四角形のY座標のランダムなオフセット範囲(最小値、最大値)
rect_width_scale_range = (0.8, 1.2)     # 四角形の幅のランダムなスケール範囲(最小倍率、最大倍率)
rect_height_scale_range = (0.8, 1.2)    # 四角形の高さのランダムなスケール範囲(最小倍率、最大倍率)
rect_angle_range = (-10, 10)            # 四角形のランダムな回転角度の範囲(最小角度、最大角度)
text_x_offset_range = (-10, 10)         # テキストのX座標のランダムなオフセット範囲(最小値、最大値)
text_y_offset_range = (-10, 10)         # テキストのY座標のランダムなオフセット範囲(最小値、最大値)
overall_angle_range = (-5, 5)           # 全体的な画像のランダムな回転角度の範囲(最小角度、最大角度)

for i, example in enumerate(train_ds):
    image = example['image'].copy()
    draw = ImageDraw.Draw(image)
    img_width, img_height = image.size

    # ランダムな変動値を生成
    rect_x_offset = random.randint(*rect_x_offset_range)
    rect_y_offset = random.randint(*rect_y_offset_range)
    rect_width_scale = random.uniform(*rect_width_scale_range)
    rect_height_scale = random.uniform(*rect_height_scale_range)
    rect_angle = random.uniform(*rect_angle_range)
    text_x_offset = random.randint(*text_x_offset_range)
    text_y_offset = random.randint(*text_y_offset_range)
    overall_angle = random.uniform(*overall_angle_range)

    # ランダムな位置とサイズで長方形を描画
    rect_left = base_rect_position[0] + rect_x_offset
    rect_top = base_rect_position[1] + rect_y_offset
    rect_right = base_rect_position[2] * rect_width_scale + rect_x_offset
    rect_bottom = base_rect_position[3] * rect_height_scale + rect_y_offset
    current_rect_position = (rect_left, rect_top, rect_right, rect_bottom)

    # 長方形を描画(回転前に描画)
    draw.rectangle(current_rect_position, fill=bg_color, outline=base_rect_outline_color, width=base_rect_line_width)

    # 埋め込む文字列を決定
    text_to_embed = texts[i % len(texts)]

    # テキストの位置をランダムに計算
    text_x = int(rect_left + base_text_position_offset[0] + text_x_offset)
    text_y = int(rect_top + base_text_position_offset[1] + text_y_offset)

    # テキストを描画(回転前に描画)
    draw.text((text_x, text_y), text_to_embed, fill=text_color, font=font)

    # 画像全体をランダムな角度で回転
    rotated_image = image.rotate(overall_angle, resample=Image.Resampling.BILINEAR, fillcolor=bg_color)

    # 保存ファイル名の作成
    output_filename = f"annotated_blueprint_random_{i}.png"
    output_path = os.path.join(output_dir, output_filename)
    rotated_image.save(output_path)

print(f"ランダムな注釈付き画像を {output_dir} に保存しました。")
実行すると、出力フォルダに書きの画像が保存されます。
画像を分類する
画像の一部を使って分類する手順は次の通りです。
- 最初に見つかった四角形の部分を切り出す
- 切り出した画像から、OCRを使って文字列に変換する
- 文字列の内容に従って元のファイルを分類する。
最初に見つかった四角形の部分を切り出す
今回は、左上の四角形内に描かれた文字列(分類1~分類5)を使って分類したいので、それ以外の部分が検知されないよう処理しておきます。具体的には、左上の大まかな部分だけを切り出す(クリッピング)という処理を行います。
次に、切り出した画像の中から四角形を探し、見つかった時点で、その四角形に囲まれた部分だけを更に切り出します。
この一連の処理を行うにあたり、ImageProcessorクラス、process_folder_images関数、callback関数を用意し、メイン処理でそれらを束ねて最終結果を得るようにしました。
| ImageProcessor | 画像のクリップ、四角形の検出などの画像処理を行うクラス。 |
|---|---|
| process_folder_images | 入力フォルダから画像を取り出し、callback 関数を呼び出し、戻り値に従って画像を出力フォルダに保存する関数。 |
| callback | process_folder_imagesから呼び出される際に渡される画像に対して、ImageProcessorのメソッドを使い、画像処理(クリップ、四角形の検出)した結果を戻り値として返す。Noneを返すと出力フォルダに保存されない。 |
| メイン処理 | ImageProcessor、process_folder_images、callbackを使って、見つかった四角形部分の画像を切り出すメイン処理。 |
ImageProcessorクラス
画像の種類(図面、写真、絵、資料など)や、切り出し箇所の着眼点(文字列、図形、マークなど)で処理が変わることや、別案件での再利用がしやすいように、ImageProcessorクラスにそのような処理を寄せておきます。
import os
import cv2
from PIL import Image
import numpy as np

class ImageProcessor:
    @staticmethod
    def crop_image(img, crop_area):
        """
        PIL Image オブジェクトを指定した範囲でクリッピングします。
        """
        try:
            cropped_img = img.crop(crop_area)
            return cropped_img
        except Exception as e:
            print(f"画像のクリッピングでエラーが発生しました: {e}")
            return None

    @staticmethod
    def extract_first_rectangle_gray(pil_img, target_color=(0, 0, 0), color_tolerance=30):  # target_color は BGR
        """
        指定した色に近い領域から最初の検出された四角形の領域を切り出します。
        """
        try:
            cv_img_bgr = np.array(pil_img.convert('RGB'))[:, :, ::-1].copy() # PIL RGB -> OpenCV BGR

            lower_bound = np.array([max(0, c - color_tolerance) for c in target_color])
            upper_bound = np.array([min(255, c + color_tolerance) for c in target_color])

            mask = cv2.inRange(cv_img_bgr, lower_bound, upper_bound)
            gray = mask  # マスクをグレースケール画像として扱う

            contours, _ = cv2.findContours(gray.copy(), cv2.RETR_EXTERNAL, cv2.CHAIN_APPROX_SIMPLE)

            if contours:
                largest_contour = max(contours, key=cv2.contourArea)
                approx = cv2.approxPolyDP(largest_contour, 0.02 * cv2.arcLength(largest_contour, True), True)

                if len(approx) == 4:
                    x, y, w, h = cv2.boundingRect(approx)
                    cropped_rect_img = pil_img.crop((x, y, x + w, y + h))
                    return cropped_rect_img
                else:
                    print(f"明確な四角形を検出できませんでした (頂点数: {len(approx)}).")
                    return None
            else:
                print(f"指定した色に近い領域が見つかりませんでした.")
                return None

        except Exception as e:
            print(f"四角形の抽出中にエラーが発生しました: {e}")
            return None

    @staticmethod
    def extract_first_rectangle_color(pil_img):
        """
        PIL Image オブジェクトから最初の検出された四角形の領域を切り出します。

        Args:
            pil_img (PIL.Image.Image): 処理する PIL Image オブジェクト。

        Returns:
            PIL.Image.Image or None: 切り出された四角形の PIL Image オブジェクト。
                                    検出できなかった場合は None を返します。
        """
        try:
            # PIL Image を NumPy 配列に変換
            cv_img = np.array(pil_img.convert('RGB'))
            # NumPy 配列を OpenCV の BGR 形式に変換 (cvtColor は BGR をデフォルトとする場合がある)
            gray = cv2.cvtColor(cv_img, cv2.COLOR_RGB2GRAY)
            blurred = cv2.GaussianBlur(gray, (5, 5), 0)
            edged = cv2.Canny(blurred, 50, 150)

            # 輪郭を検出
            contours, _ = cv2.findContours(edged.copy(), cv2.RETR_EXTERNAL, cv2.CHAIN_APPROX_SIMPLE)

            if contours:
                # 最も大きい輪郭(面積で判断)を四角形として仮定
                largest_contour = max(contours, key=cv2.contourArea)
                approx = cv2.approxPolyDP(largest_contour, 0.02 * cv2.arcLength(largest_contour, True), True)

                if len(approx) == 4:
                    # 四角形とみなせる場合、座標を取得
                    x, y, w, h = cv2.boundingRect(approx)
                    cropped_rect_img = pil_img.crop((x, y, x + w, y + h))
                    return cropped_rect_img
                else:
                    print(f"明確な四角形を検出できませんでした (頂点数: {len(approx)}).")
                    return None
            else:
                print(f"輪郭を検出できませんでした.")
                return None

        except Exception as e:
            print(f"四角形の抽出中にエラーが発生しました: {e}")
            return None


    @staticmethod
    def binarize_image(pil_img, threshold_value=128):
        """
        PIL Image オブジェクトを二値化します。
        """
        try:
            gray_cv_img = np.array(pil_img.convert('L'))
            _, binary_cv_img = cv2.threshold(gray_cv_img, threshold_value, 255, cv2.THRESH_BINARY)
            binary_pil_img = Image.fromarray(binary_cv_img)
            return binary_pil_img
        except Exception as e:
            print(f"二値化処理でエラーが発生しました: {e}")
            return None
process_folder_images
入力フォルダからファイルを読み出し、コールバック関数でファイルの処理(今回は切り出し)を行い、結果を出力フォルダに書き出す関数です。
コールバック関数には、処理したい画像データが渡され、コールバック関数が処理結果の画像を戻り値として返すことで、結果がファイルに保存されます。
def process_folder_images(input_folder, output_folder, processing_callback):
    """
    指定されたフォルダ内のすべての画像ファイルを処理し、コールバック関数を適用し、
    その結果(画像)を出力フォルダに保存します。
    """
    os.makedirs(output_folder, exist_ok=True)
    image_extensions = ['.png', '.jpg', '.jpeg', '.bmp', '.gif']  # 対応する画像拡張子

    for filename in os.listdir(input_folder):
        if any(filename.lower().endswith(ext) for ext in image_extensions):
            input_path = os.path.join(input_folder, filename)
            output_path = os.path.join(output_folder, filename)

            try:
                pil_image = Image.open(input_path)
                processed_image = processing_callback(pil_image)

                if processed_image:
                    processed_image.save(output_path)
                    print(f"処理された画像を {output_path} に保存しました。")
                else:
                    print(f"コールバック関数が画像を返しませんでした: {output_path} への保存をスキップします。")

            except Exception as e:
                print(f"画像の処理中にエラーが発生しました: {input_path} - {e}")
callback
process_folder_imagesから呼び出されるコールバック関数です。今回は切り取り精度を上げるため、画像左上の画像をクリッピングし、その結果の中から四角形の枠を探しに行きます。
そして、まずモノクロ画像として、四角形の枠を検出(extract_first_rectangle_gray)し、見つからない場合はカラー画像として四角形の枠を検出(extract_first_rectangle_color)することで、検出精度を高めています。
# コールバック関数(クリッピングと四角形抽出)
def callback(img):
    """
    画像をクリッピングし、その後二値化処理を適用して四角形を抽出します。
    クリッピング領域と二値化閾値はここで直接定義。
    """
    crop_area = (0, 0, 800, 400)
    img = ImageProcessor.crop_image(img, crop_area)
    if img:
        res = ImageProcessor.extract_first_rectangle_gray(img)
        if res is None:
            res = ImageProcessor.extract_first_rectangle_color(img)
        return res
    else:
        None
メイン処理
メインの切り出し処理です。
# =========== 画像の切り出し処理 ===============
input_directory = r"P:\annotated_factorio_images_random"
output_directory_binarized = r"P:\extract_binarized_pipeline"

# 関数の呼び出し
process_folder_images(input_directory, output_directory_binarized, processing_callback=callback)
切り出しの実行結果
上記4つの処理を実行することで、下記の通り四角形の部分が切り出せました。全部で67枚ありましたが、切り出せたのは66枚です。1枚だけ失敗してしまいましたが、今回は手順を説明したいので、深追いはやめます。
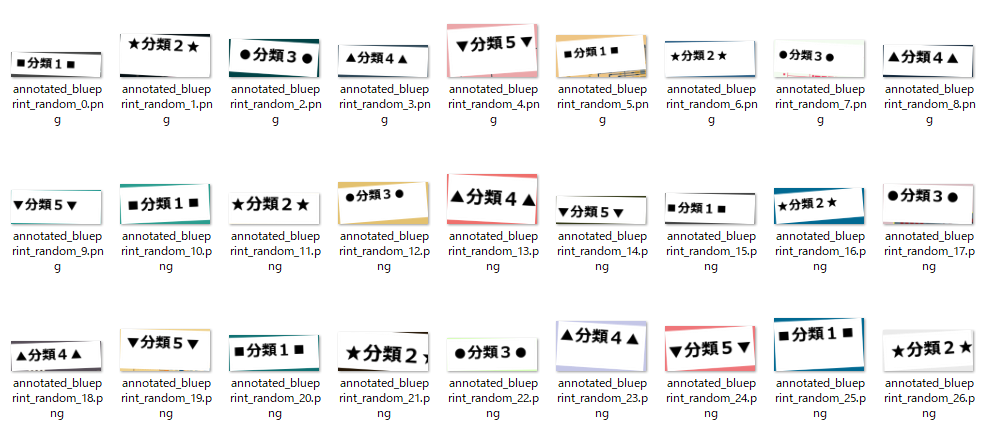
切り出した画像から、OCRを使って文字列に変換する
切り出した画像に対してOCRで文字列に変換します。今回はeasyocrというモジュールを使うので、下記の通りインストールしておきます。
pip install easyocr
perform_ocr_on_folder関数は、指定したフォルダの画像を読み取り、文字列に変換する関数です。
import easyocr
import os

def perform_ocr_on_folder(folder_path, languages=['en', 'ja']):
    """
    指定されたフォルダ内のすべての画像ファイルに対してOCRを実行し、
    ファイル名、認識されたテキスト文字、信頼度をリスト形式で返します。

    Args:
        folder_path (str): 画像ファイルが格納されたフォルダのパス。
        languages (list, optional): OCRで認識する言語のリスト。デフォルトは ['en', 'ja']。

    Returns:
        list: 各要素が [ファイル名, 認識されたテキスト, 信頼度] のリスト。
              OCRに失敗したファイルの場合は、ファイル名と信頼度 None が格納されます。
    """
    results_list = []
    reader = easyocr.Reader(languages)
    image_extensions = ['.png', '.jpg', '.jpeg', '.bmp', '.gif']  # 対応する画像拡張子

    for filename in os.listdir(folder_path):
        if any(filename.lower().endswith(ext) for ext in image_extensions):
            file_path = os.path.join(folder_path, filename)
            try:
                result = reader.readtext(file_path)
                for detection in result:
                    _, text, confidence = detection
                    results_list.append([filename, text, confidence])
                if not result:  # テキストが何も認識されなかった場合も追加
                    results_list.append([filename, None, None])
            except Exception as e:
                print(f"Error processing file: {filename} - {e}")
                results_list.append([filename, None, None])
    return results_list
下記がメイン処理です。参照先のフォルダ名は、ご自身の環境に合わせて適宜変更してください。
folder_to_process = 'P:/extract_binarized_pipeline'
ocr_results_list = perform_ocr_on_folder(folder_to_process)

for item in ocr_results_list:
    filename, text, confidence = item
    print(f"File: {filename}, Text: '{text}', Confidence: {confidence}")
実行すると下記の通り結果が表示されました。結果は1ファイルに付き、ファイル名、認識された文字列、精度の3項目を1セットとしたリストで返されます。
Neither CUDA nor MPS are available - defaulting to CPU. Note: This module is much faster with a GPU.
File: annotated_blueprint_random_0.png, Text: '分類1亘', Confidence: 0.059798713773489
File: annotated_blueprint_random_1.png, Text: '分類2', Confidence: 0.5851585456691245
File: annotated_blueprint_random_10.png, Text: '分類1亘', Confidence: 0.09369193762540817
File: annotated_blueprint_random_11.png, Text: '分類2', Confidence: 0.9735556215639418
File: annotated_blueprint_random_12.png, Text: '分類3', Confidence: 0.980456892161166
File: annotated_blueprint_random_13.png, Text: '分類4', Confidence: 0.9912138300732262
File: annotated_blueprint_random_14.png, Text: '分類5', Confidence: 0.9929213576746074
File: annotated_blueprint_random_15.png, Text: '分類1.', Confidence: 0.2221888154745102
File: annotated_blueprint_random_16.png, Text: '分類2', Confidence: 0.9786179509178026
File: annotated_blueprint_random_17.png, Text: '分類3', Confidence: 0.9802699089282902
File: annotated_blueprint_random_18.png, Text: '分類4ん', Confidence: 0.5068560838699341
File: annotated_blueprint_random_19.png, Text: '分類5', Confidence: 0.9914252902213463
~~~~~~~~~~~~~~ 以下省略 ~~~~~~~~~~~~~~~
記号文字(■、●、★、▲、▼)は認識されませんでしたが、文字列は正しく認識されました。従って、この文字列の結果を使えば、ファイルは分類できそうです。
文字列の内容に従って元のファイルを分類する
perform_ocr_on_folder関数の戻り値(ファイル名、認識された文字列、精度の3項目を1セットとしたリスト)を使って、フォルダに不利割れば完了です。
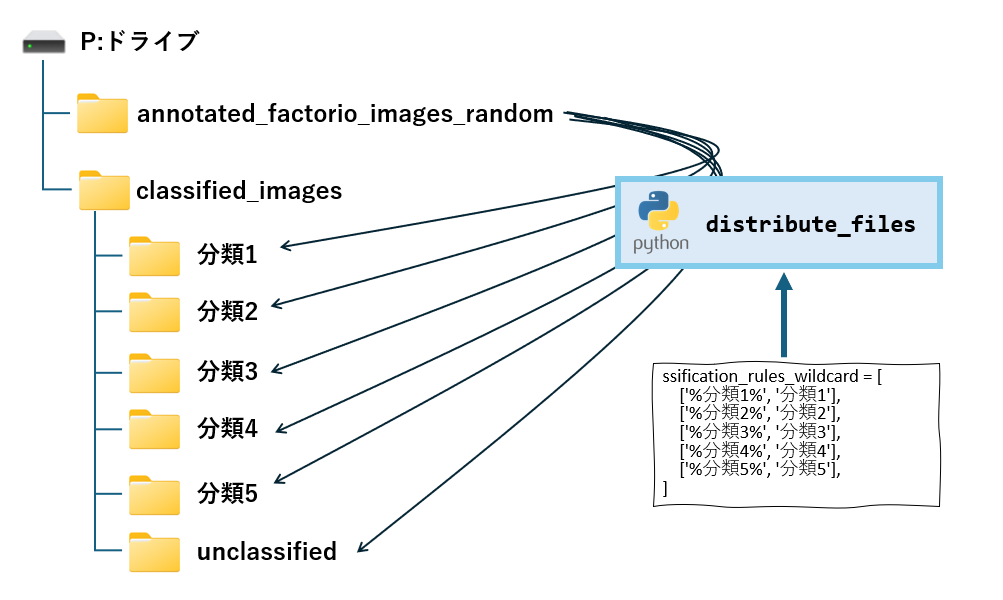
distribute_filesは、classification_rules_wildcardに振り分けルール(指定した文字列と一致する場合、対応するフォルダにコピー)に従って、元のファイルを振り分ける関数です。
振り分けルールは、キーワードと振り分け先フォルダを1組として、リストで指定します。キーワードには%を使ったワイルドカードの指定が可能で、%の位置によって前方一致(~%)、後方一致(%~)、曖昧検索(%~%)が指定できます。
[ [キーワード1,フォルダ1],[キーワード2,フォルダ2],・・・]
import os
import shutil
import re

def distribute_files(ocr_results, input_folder, output_folder, distribution_rules):
    """
    OCR結果のリストに基づいて、入力フォルダからファイルを取得し、
    出力フォルダ配下のワイルドカード '%' を使用したルールに従ったフォルダに振り分けます。

    Args:
        ocr_results (list): 各要素が [ファイル名, 認識されたテキスト, 信頼度] のリスト。
        input_folder (str): 元の画像ファイルが格納されているフォルダのパス。
        output_folder (str): 振り分け先のルートフォルダのパス。
        distribution_rules (list): 振り分けルールを定義したリスト。
                                  各要素は ['%検索キーワード%', '振り分け先フォルダ名'] のリスト形式。
                                  '%' は0個以上の任意の文字にマッチするワイルドカードとして扱われます。
    """
    os.makedirs(output_folder, exist_ok=True)

    for result in ocr_results:
        filename, text, confidence = result

        if filename is None:
            print(f"警告: ファイル名が不明なOCR結果をスキップします。")
            continue

        source_path = os.path.join(input_folder, filename)

        if not os.path.exists(source_path):
            print(f"警告: 入力フォルダにファイル '{filename}' が見つかりません。スキップします。")
            continue

        destination_folder = None
        if text:
            for rule in distribution_rules:
                pattern, destination = rule
                # ワイルドカード '%' を正規表現の '.*' に置換してマッチング
                regex_pattern = "^" + re.escape(pattern).replace('%', '.*') + "$"
                if re.search(regex_pattern, text.lower()):
                    destination_folder = os.path.join(output_folder, destination)
                    break

        if destination_folder:
            os.makedirs(destination_folder, exist_ok=True)
            destination_path = os.path.join(destination_folder, filename)
            try:
                shutil.copy2(source_path, destination_path)
                print(f"ファイル '{filename}' を '{destination}' フォルダに振り分けました (ルール: '{pattern}')。")
            except Exception as e:
                print(f"エラー: ファイル '{filename}' のコピー中にエラーが発生しました: {e}")
        else:
            default_destination = os.path.join(output_folder, 'unclassified')
            os.makedirs(default_destination, exist_ok=True)
            destination_path = os.path.join(default_destination, filename)
            try:
                shutil.copy2(source_path, destination_path)
                print(f"ファイル '{filename}' は分類ルールに合致せず、'unclassified' フォルダに振り分けました。")
            except Exception as e:
print(f"エラー: ファイル '{filename}' のコピー中にエラーが発生しました: {e}")下記プログラムは、perform_ocr_on_folderで画像から文字列を抽出し、その結果を使って元のファイルを振り分けるサンプルです。
# 切り出した画像(OCRに掛けたい画像)を格納したフォルダ
folder_to_process = 'P:/extract_binarized_pipeline'

# 切り出した画像をOCRで文字列化する
ocr_results_list = perform_ocr_on_folder_simplified(folder_to_process)

# 分類結果を画面に表示する
for item in ocr_results_list:
    filename, text, confidence = item
    print(f"File: {filename}, Text: '{text}', Confidence: {confidence}")


# 入力フォルダと出力フォルダのパスを設定 (実際のものに合わせてください)
input_directory = r'P:\annotated_factorio_images_random'  # 例: 元の画像が入っているフォルダ
output_directory = r'P:\classified_images' # 例: 振り分け先のルートフォルダ

# ワイルドカード '%' を使用した振り分けルールのリスト
classification_rules_wildcard = [
        ['%分類1%', '分類1'],
        ['%分類2%', '分類2'],
        ['%分類3%', '分類3'],
        ['%分類4%', '分類4'],
        ['%分類5%', '分類5'],
    ]

# 実際にファイルを振り分ける関数を呼び出す
distribute_files(ocr_results_list, input_directory, output_directory, classification_rules_wildcard)

print("ファイルの振り分け処理が完了しました ")
ファイル 'annotated_blueprint_random_0.png' を '分類1' フォルダに振り分けました (ルール: '%分類1%')。
ファイル 'annotated_blueprint_random_1.png' を '分類2' フォルダに振り分けました (ルール: '%分類2%')。
ファイル 'annotated_blueprint_random_10.png' を '分類1' フォルダに振り分けました (ルール: '%分類1%')。
ファイル 'annotated_blueprint_random_11.png' を '分類2' フォルダに振り分けました (ルール: '%分類2%')。
ファイル 'annotated_blueprint_random_12.png' を '分類3' フォルダに振り分けました (ルール: '%分類3%')。
ファイル 'annotated_blueprint_random_13.png' を '分類4' フォルダに振り分けました (ルール: '%分類4%')。
ファイル 'annotated_blueprint_random_14.png' を '分類5' フォルダに振り分けました (ルール: '%分類5%')。
ファイル 'annotated_blueprint_random_15.png' を '分類1' フォルダに振り分けました (ルール: '%分類1%')。
ファイル 'annotated_blueprint_random_16.png' を '分類2' フォルダに振り分けました (ルール: '%分類2%')。
~~~~~~~~~~~~~~ 以下省略 ~~~~~~~~~~~~~~~
まとめ
今回は、大量の過去スキャン画像から、画像の一部に着目して効率的にファイルを分類する手法をご紹介しました。深層学習モデルを構築する代わりに、OpenCV と OCR という比較的シンプルなツールを組み合わせることで、手書き領収書や設計図、部品リストなど、様々な種類の文書画像を、それぞれの特徴に基づいて自動的に振り分けることができます。
具体的な手順としては、
- テストデータの準備:
Hugging Face のデータセットを加工し、分類用の文字列を埋め込んだテスト画像を生成しました。 - 画像の切り出し:
OpenCV を用いて、画像内の特定の領域(四角形)を検出し、そこに含まれる情報を抽出しました。 - OCR によるテキスト抽出:
easyocr を用いて、切り出した画像から文字列を読み取りました。 - ファイルの振り分け:
抽出した文字列に基づいて、元のファイルを指定したフォルダに自動的に振り分けました。
この手法を用いることで、大量のデジタル画像データを手作業で分類する手間を大幅に削減し、その後のデータ管理や検索を効率化できることが期待できます。


コメント