YOLOは「画像に何が写っているか」を一瞬で判断できる、最先端の物体検出技術です。特にリアルタイム処理に強く、監視カメラ、自動運転、産業機械などで幅広く利用されています。
本記事では、Ultralytics社が開発した最新版YOLOv8を使って、画像内の物体を検出し、さらに独自データで追加学習する方法まで解説します。
YOLOとは
YOLO(You Only Look Once)は、物体検出 のためのディープラーニングアルゴリズムの一つです。画像や動画内の物体を高速かつ高精度に検出できる技術で、特にリアルタイム処理が求められる場面で活用されています。
✅ 高速処理:画像全体を一度に解析するため、リアルタイムでの物体検出が可能
✅ 高精度:複数の物体を同時に検出し、それぞれの位置を特定できる
✅ シンプルな構造:従来の手法よりも計算コストが低く、実装が容易
YOLOは、画像をグリッド状に分割し、各セルごとに物体の有無を予測します。これにより、従来の「領域提案+分類」の手法よりも高速に物体を検出できます。
尚、今回紹介するYOLO8の中にも、サイズや用途によって5種類が存在します。記事ではYOLOv8nを使っていますが、必要に応じて適宜変更してください。
| モデル名 | パラメータ数 | 処理速度(fps) | 精度(mAP) | 用途・特徴 |
|---|---|---|---|---|
| YOLOv8n(nano) | 約3M | 非常に速い | やや低め | 超軽量モデル。モバイルやリアルタイム用途に◎ |
| YOLOv8s(small) | 約11M | 速い | 中程度 | 軽量でそこそこ精度もある。小型デバイス向けに最適 |
| YOLOv8mmedium) | 約25M | 普通 | 高め | バランス型。精度・速度の両立 |
| YOLOv8l(large) | 約43M | やや遅め | 高い | 精度重視。GPU推奨 |
| YOLOv8x(xlarge) | 約68M | 遅め | 非常に高い | 最高精度。GPU必須、大規模データ向け |
Ultralytics について
YOLO は Joseph Redmon によって開発され、その後コミュニティによる改良が続きました。そして、Ultralytics が YOLO の進化を牽引し、より使いやすく洗練されたバージョンである YOLOv5 や YOLOv8 をリリースしました。
✅ YOLO を 軽量化・高速化 し、リアルタイム処理を強化
✅ Python ライブラリ ultralytics を提供し、簡単に導入可能に
✅ クラウドプラットフォーム Ultralytics HUB を開発し、コード不要で AI の管理が可能に
YOLOによる物体検出
あらかじめ、pipにて下記のモジュールをインストールしておきます。
pip install ultralytics
pip install opencv-python
pip install numpy
pip install torch torchvision torchaudio --index-url https://download.pytorch.org/whl/cu118
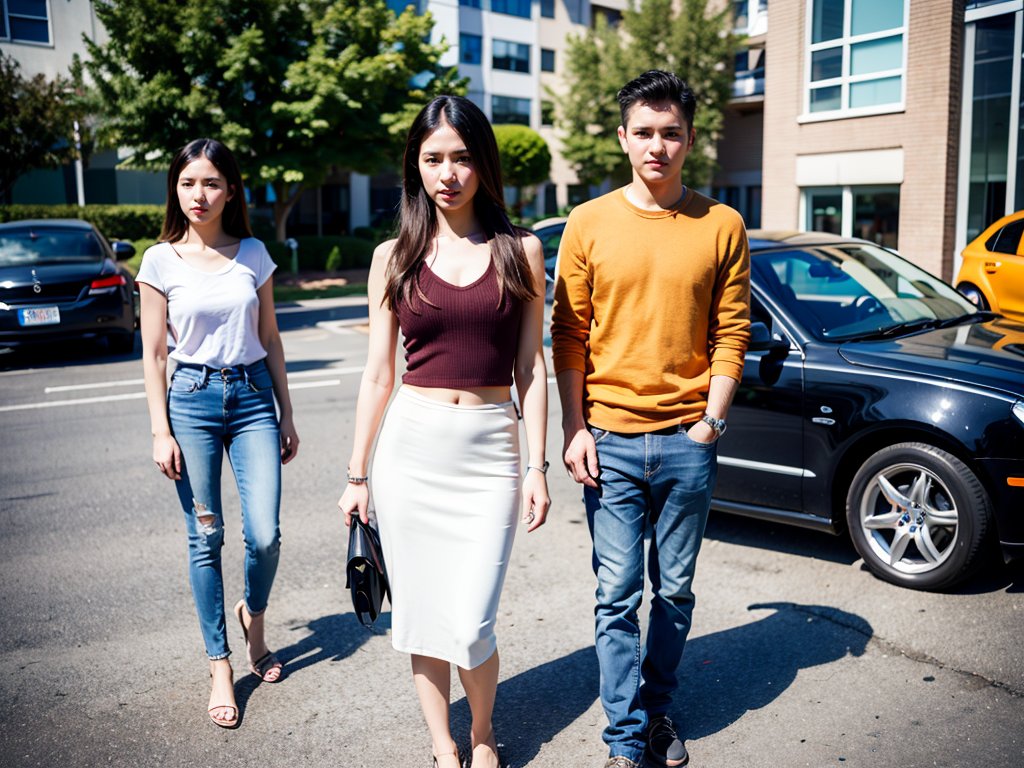
次に、下記の画像を右クリックでダウンロードし、任意のフォルダに置いてください。
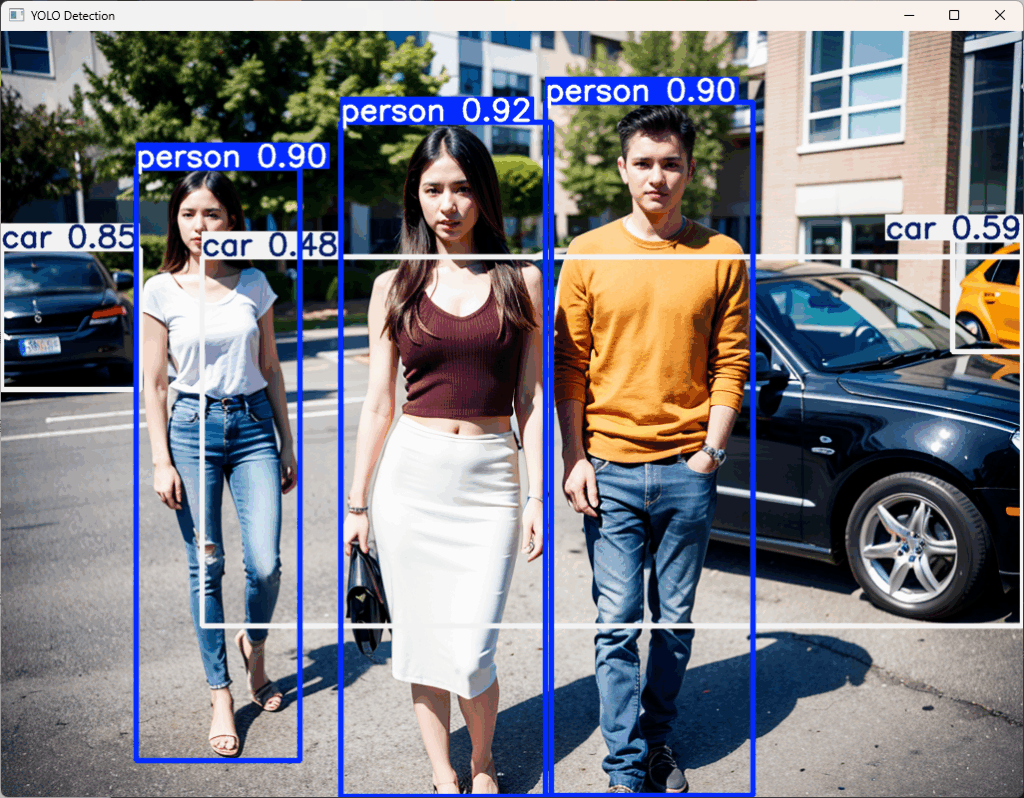
下記のプログラムを実行すると、画像に写っている人と車が検出されます。
- 初回実行時、必票なモデルファイル(今回は yolov8n.pt)は自動的にダウンロードされます。
- 8行目はダウンロードした画像の場所に応じて適宜書き換えて下さい。
from ultralytics import YOLO
import cv2  # OpenCV を使用

# YOLOv8(最も軽量なモデルで、精度よりも速度を優先)のモデルをロード
model = YOLO("yolov8n.pt")

# 画像を解析(★★ファイルの場所はご自身の環境に合わせて書き換えて下さい)
results = model.predict("p:/yolo_sample1.png", save=True)

# 検出結果の画像を取得
result_img = results[0].plot()  # 検出結果を画像に描画

# 画像を表示(手動で閉じるまで表示)
cv2.imshow("YOLO Detection", result_img)
cv2.waitKey(0)  # キー入力を待つ(ウィンドウが閉じない)
cv2.destroyAllWindows()  # ウィンドウを閉じる
実行すると下記の画像が表示され、車と人物が検出されたことが分かります。
追加学習
人や車、テーブルやグラスなど、一般的なオブジェクトの検出は、公開されているモデルファイルyolov8n.ptを使えば事が足りますので、ここでは独自のオブジェクトを追加学習する方法について解説します。
追加学習させる場合は、次の手順を行います。
- 学習データの準備
- アノテーションの実施
- アノテーション結果から、学習用と検証用のデータを作成
- 学習の実施
- 結果の検証
- 学習済みモデルの利用
学習データの準備
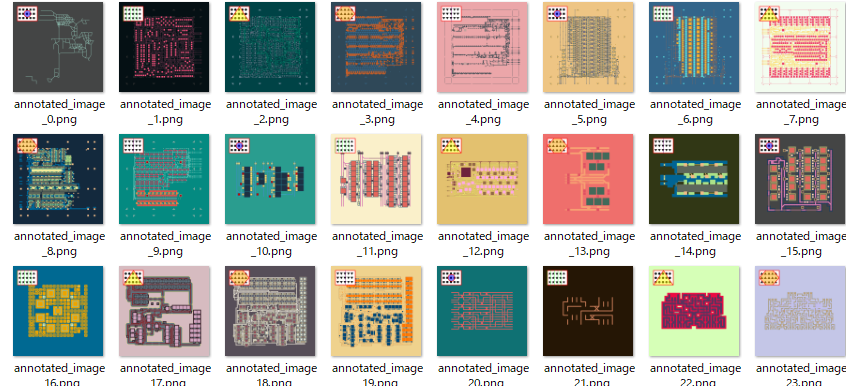
今回は、HuggingFaceで公開されている1024×1024の画像をテストデータを少し加工します。あらかじめ、datasetsモジュールをインストールしておきます。
pip install datasets
次に、下記のプログラムを実行してください。加工したテスト画像の出力先は、output_dirで指定しますので、ご自身の環境に置き換えてから実行してください。成功すると上図のテストデータが67枚作成されます。
import os
from datasets import load_dataset
from PIL import Image, ImageDraw, ImageFont
# ★★★★ 出力ディレクトリの作成 ★★★★
output_dir = "p:/annotated_images"
os.makedirs(output_dir, exist_ok=True)
# データセットのロード
ds = load_dataset("piebro/factorio-blueprint-visualizations")
train_ds = ds['train']
# 埋め込む文字列のリスト
texts = [
"■■■■■\n■■■■■\n■■■■■",
"★★★★★\n★★★★★\n★★★★★",
"●●●●●\n●●●●●\n●●●●●",
"▲▲▲▲▲\n▲▲▲▲▲\n▲▲▲▲▲",
"▼▼▼▼▼\n▼▼▼▼▼\n▼▼▼▼▼"
]
# 図形の色(透明度 50%)
shape_colors = [
(0, 0, 255, 128), # 半透明の青
(0, 255, 0, 128), # 半透明の緑
(255, 255, 0, 128), # 半透明の黄
(255, 165, 0, 128), # 半透明のオレンジ
(128, 0, 128, 128) # 半透明の紫
]
# 基本パラメータ
base_rect_position = (50, 50, 280, 220) # 四角形の固定位置
base_rect_outline_color = (255, 0, 0, 255) # 枠線(不透明な赤)
base_rect_line_width = 6 # 枠線の太さ
base_font_size = 40 # フォントサイズ
font = ImageFont.truetype("C:/WINDOWS/Fonts/MEIRYOB.TTC", base_font_size) # フォント
text_color = "black" # テキストの色
base_text_position_offset = (10, 10) # テキストのオフセット(固定)
# 背景色(白固定)
background_color = (255, 255, 255, 255)
# 図形の描画用パラメータ
rect_center_x = (base_rect_position[0] + base_rect_position[2]) // 2
rect_center_y = (base_rect_position[1] + base_rect_position[3]) // 2
shape_size = 80 # 図形のサイズ
for i, example in enumerate(train_ds):
# 画像を RGBA モードで作成
image = example['image'].convert("RGBA")
draw = ImageDraw.Draw(image)
# 長方形の固定位置
rect_left, rect_top, rect_right, rect_bottom = base_rect_position
# 長方形を描画(背景色は白固定)
draw.rectangle((rect_left, rect_top, rect_right, rect_bottom), fill=background_color, outline=base_rect_outline_color, width=base_rect_line_width)
# 埋め込む文字列を決定
text_to_embed = texts[i % len(texts)]
# テキストの固定位置を計算
text_x = rect_left + base_text_position_offset[0]
text_y = rect_top + base_text_position_offset[1]
# テキストを描画
draw.text((text_x, text_y), text_to_embed, fill=text_color, font=font)
# 図形の色(順番に適用)
shape_color = shape_colors[i % len(shape_colors)]
# ★★★★ 透明な図形レイヤーを作成 ★★★★
overlay = Image.new("RGBA", image.size, (255, 255, 255, 0)) # 透明レイヤー
overlay_draw = ImageDraw.Draw(overlay)
shape_type = i % 5 # 図形タイプをローテーション
if shape_type == 0: # 円
overlay_draw.ellipse((rect_center_x - shape_size//2, rect_center_y - shape_size//2,
rect_center_x + shape_size//2, rect_center_y + shape_size//2), fill=shape_color, outline=base_rect_outline_color, width=base_rect_line_width)
elif shape_type == 1: # 格子(三角形パターン)
for j in range(5):
overlay_draw.line([(rect_left + j*40, rect_top), (rect_left + j*40, rect_bottom)], fill=shape_color, width=base_rect_line_width)
elif shape_type == 2: # 三角形
overlay_draw.polygon([(rect_center_x, rect_top), (rect_left, rect_bottom), (rect_right, rect_bottom)], fill=shape_color, outline=base_rect_outline_color, width=base_rect_line_width)
elif shape_type == 3: # 六角形
hex_points = [
(rect_center_x - shape_size//2, rect_top),
(rect_center_x + shape_size//2, rect_top),
(rect_right, rect_center_y),
(rect_center_x + shape_size//2, rect_bottom),
(rect_center_x - shape_size//2, rect_bottom),
(rect_left, rect_center_y)
]
overlay_draw.polygon(hex_points, fill=shape_color, outline=base_rect_outline_color, width=base_rect_line_width)
elif shape_type == 4: # 縦線
overlay_draw.line([(rect_center_x, rect_top), (rect_center_x, rect_bottom)], fill=shape_color, width=base_rect_line_width)
# ★★★★ 透明レイヤーを画像に合成 ★★★★
image = Image.alpha_composite(image, overlay)
# 保存ファイル名を作成
output_filename = f"annotated_image_{i}.png"
output_path = os.path.join(output_dir, output_filename)
image.save(output_path)
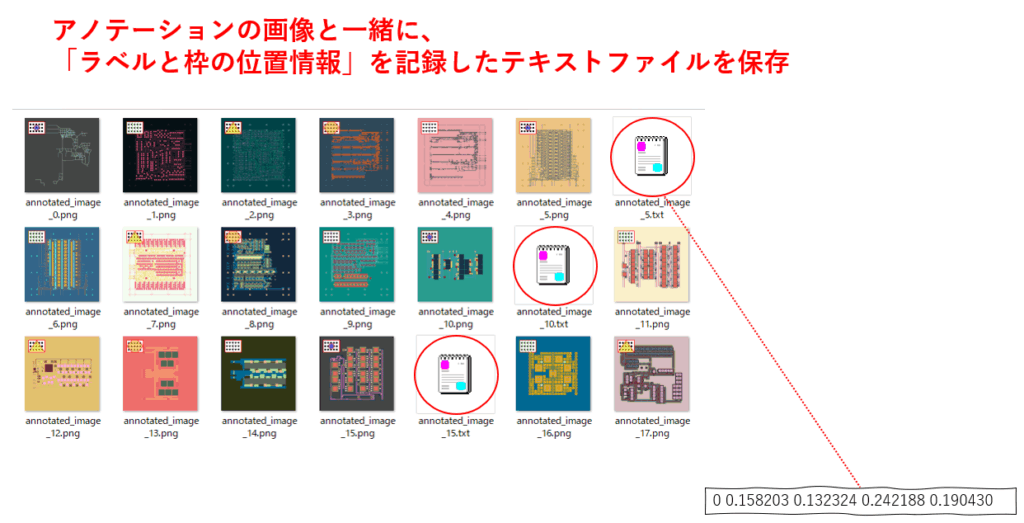
print(f"図形の透明度を 0.5 にし、テキストと無関係な色ローテーションに変更しました。")アノテーションの実施
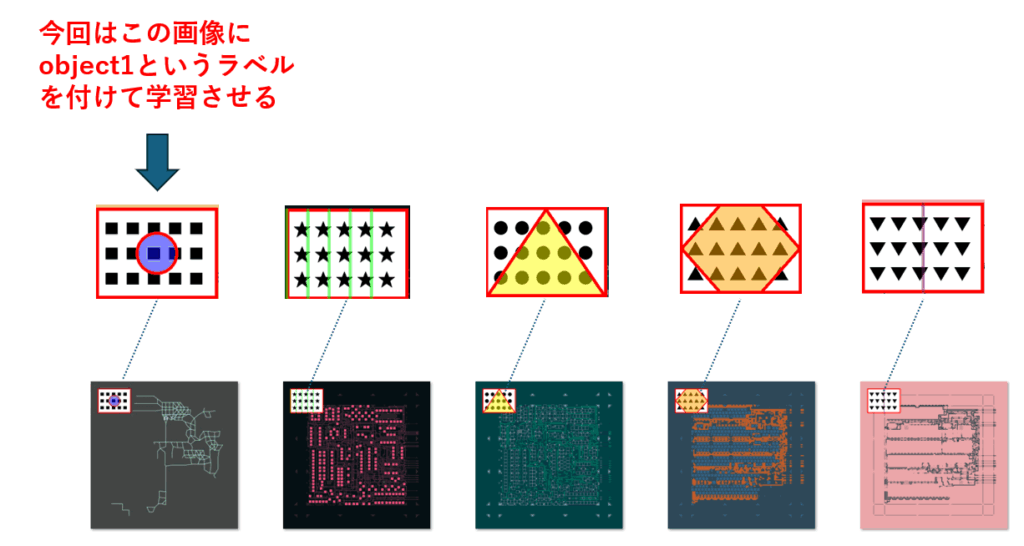
今回は、上図の通り一番左の画像を、追加学習にて検出させたいと思います。そこで必要なのがアノテーションです。アノテーション(Annotation)とは、データに補足情報やラベルを付与する作業のことです。
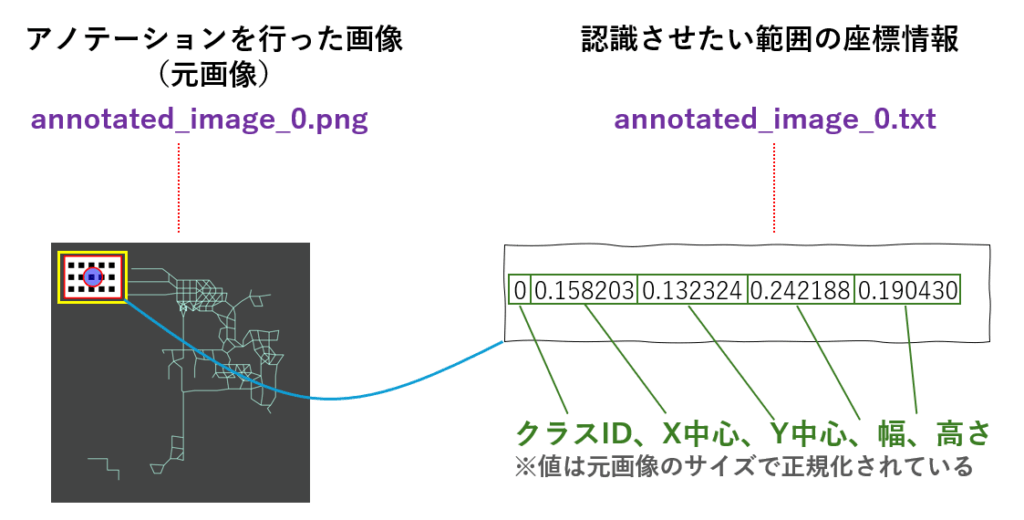
YOLOに学習させるには、元画像と合わせて、認識させたい部分の中心座標、幅、高さと、ラベル(=クラスID)を格納したテキストを、対として作成しなければなりません。
今回の例では、すべての画像に何らかのラベルが存在していることを前提としていますが、例えば、製品の亀裂、錆、塗装ムラなどの有無を分類したい場合もよくあります。この場合は、正常な画像に対して、空のアノテーションファイルを用意し、一緒に学習させます。
以下に、アノテーションのポイントをまとめておきます。
- ラベルありの画像:
各画像には、特定のクラス(ロゴ、亀裂、錆、塗装ムラなど)が存在する場合、そのクラスに対応するアノテーションが記述されます。 - ラベルなしの画像:
これらの画像には、特定のクラスが存在しない場合、空のアノテーションファイルを用意します。つまり、アノテーションファイルは作成するが、内容は何も記述しません。 - データのバランス:
ラベルありの画像とラベルなしの画像の数をできるだけ同じにすることで、モデルが偏った学習をするのを防ぎ、より一般化された性能を持つようになります。
これを手作業で行うのは気が遠くなるため、通常はアノテーションツールを使い、認識させたい画像の部分を枠(=バウンディングボックス)で囲み、ラベルをつけていく作業を行います。
アノテーションツールは数多く出回っていますので、お好きなものを選んでお使いください。
アノテーションした結果が学習や検証に使われるため、非常に重要な作業ではありますが、地道な作業でもあります。認識させたい画像によっては、数千枚や数万枚分のアノテーションが必要になるケースもあるため、数十枚や数百枚だけアノテーションし、画像処理や生成AIを使ってパターンを増やすなど、水増し(データ拡張)する場合もあります。
データ拡張の具体的な方法については、「【Python実践】画像分類を強化するデータ拡張(Image Augmentation)サンプル集」が参考になります。
アノテーション結果から、学習用と検証用のデータを作成
アノテーション結果(画像とテキストの対)が出来たら、今度は学習用と検証用に分割し、所定のフォルダに置く作業が必要です。
具体的には、下記のフォルダ構成で、画像とテキストを振り分けていくと共に、ラベルとクラスIDの対応表や、フォルダのパスを格納したYAMLファイルを作成します。
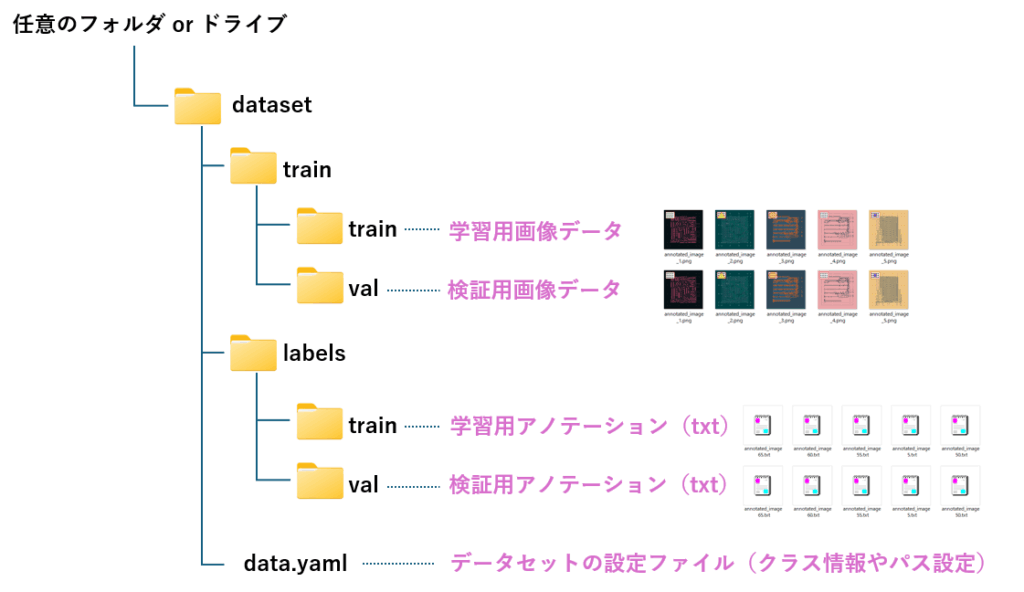
YAMLファイルには、次の内容を記述します。
train:→ 学習用データの画像フォルダのパスval:→ 検証用データの画像フォルダのパスnc:→ クラス数(1 なら1種類のオブジェクトのみ)names:→ クラス名(object1はオブジェクトの名称)
    train: P:/classified_images\train\images
    val: P:/classified_images\val\images
    nc: 1
    names: ['object1']
クラス名はラベル名のことです。クラス名には、左から順に0から始まる連番がIDとして自動付与されます。
学習の実施
追加学習はtrainを呼び出すだけです。
trainのdata 引数にYAMLファイルのパスを指定することで、先ほど用意した学習データが使用されます。
従って、この部分はご自身の環境に合わせて変更してください。
それ以外は、とりあえずこのままでも問題ありません。
from ultralytics import YOLO

# 既存のモデルをロード(事前学習済みのYOLOv8モデル)
model = YOLO('yolov8n.pt')  # "yolov8.pt"

# 追加学習を実施
results = model.train(
    data=r'P:\classified_images\data.yaml',  # データセットの設定ファイル
    epochs=10,  # 学習回数(必要に応じて変更)
    batch=8,  # バッチサイズ
    imgsz=640,  # 画像サイズ(入力画像をリサイズ)
    device='cpu'  # CPU 又は GPU(CUDA)
)
学習が始まると、進捗を示すバーが表示され、数分後に学習は完了します。
~~~~~~~~省略~~~~~~~~
10 epochs completed in 0.008 hours.
Optimizer stripped from runs\detect\train5\weights\last.pt, 6.2MB
Optimizer stripped from runs\detect\train5\weights\best.pt, 6.2MB
Validating runs\detect\train5\weights\best.pt…
Ultralytics 8.3.126 Python-3.12.3 torch-2.2.2+cpu CPU (13th Gen Intel Core(TM) i5-13400)
Model summary (fused): 72 layers, 3,005,843 parameters, 0 gradients, 8.1 GFLOPs
Class Images Instances Box(P R mAP50 mAP50-95): 100%|██████████| 1/1 [00:00<00:00, 1.90it/s]
all 8 8 0.00333 1 0.995 0.887
Speed: 1.0ms preprocess, 46.9ms inference, 0.0ms loss, 4.1ms postprocess per image
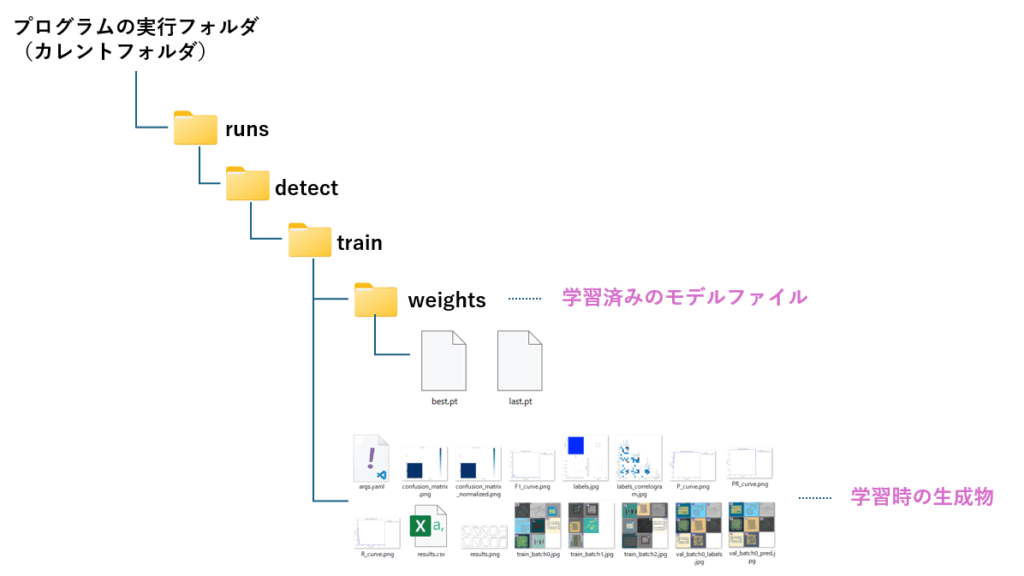
モデルファイルは下図の通り、プログラム実行フォルダ配下の runs>detect>train>weights フォルダに作成されます。この時、best.pt とlast.pg の2つが生成されていますが、通常は best.ptを使います。
結果の検証
学習結果の検証は、valを使います
YOLOの引数に、先ほど学習させたモデルファイルのパス(best.pyのパス)を指定します。また、valのdata引数に、学習時と同じ YAMLファイルのパスを指定します。
従って、この2つの部分はご自身の環境に合わせて変更してください。
学習時に使った train の引数から、epochs以外を張り付けて頂ければ問題ありません。
from ultralytics import YOLO

# 追加学習後のモデルをロード(学習済みモデルのパスを指定)
model = YOLO('runs/detect/train/weights/best.pt')  # "best.pt" は最も精度が高い学習済みモデル

# 検証を実施
results = model.val(
    data=r'P:\classified_images\data.yaml',  # データセットの設定ファイル
    batch=8,  # バッチサイズ
    imgsz=640,  # 画像サイズ(入力画像をリサイズ)
    device='cpu'  # CPU または GPU(CUDA)
)
検証が始まると、下記の通り進捗バーが表示され、数分後に結果が出力されます。
Ultralytics 8.3.126 Python-3.12.3 torch-2.2.2+cpu CPU (13th Gen Intel Core(TM) i5-13400)
Model summary (fused): 72 layers, 3,005,843 parameters, 0 gradients, 8.1 GFLOPs
val: Fast image access (ping: 0.00.0 ms, read: 1170.4654.0 MB/s, size: 149.8 KB)
val: Scanning P:\classified_images\val\labels.cache… 8 images, 0 backgrounds, 0 corrupt: 100%|██████████| 8/8 [00:00<?, ?it/s]
Class Images Instances Box(P R mAP50 mAP50-95): 100%|██████████| 1/1 [00:00<00:00, 1.85it/s]
all 8 8 0.00333 1 0.995 0.887
Speed: 2.3ms preprocess, 46.9ms inference, 0.0ms loss, 4.2ms postprocess per image
Results saved to runs\detect\val
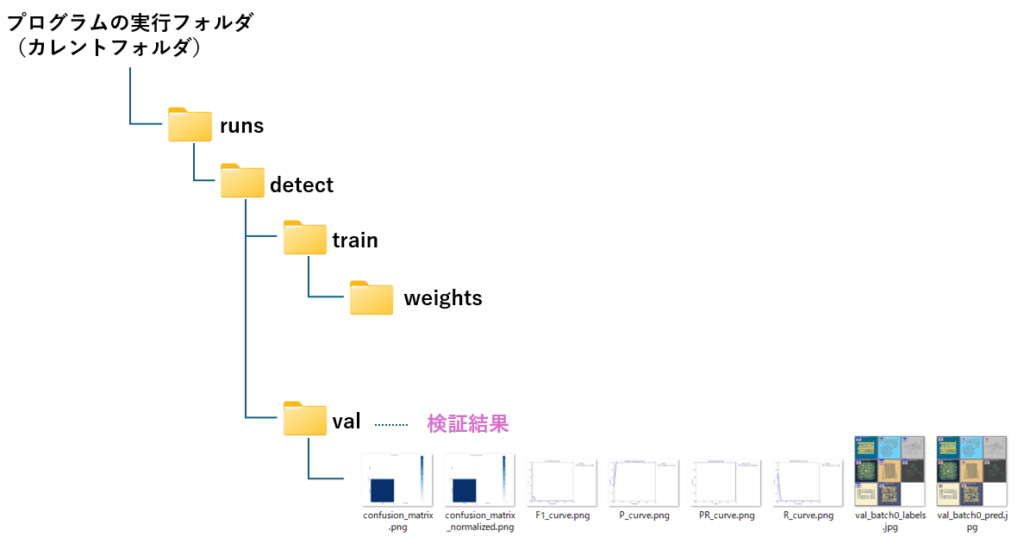
結果は学習時と同じ runs>detectフォルダの配下に、val フォルダが作成され、そこに成果物が保存されます。
学習済みモデルの利用
ここまでの作業で、追加学習されたモデルが完成しました。
では、実際の画像で確認してみましょう。まず、元のモデル(yolov8n.pt)の結果です。
当然のことながら、人とラップトップしか認識していません。
from ultralytics import YOLO
import cv2  # OpenCV を使用

# YOLOv8(最も軽量なモデルで、精度よりも速度を優先) のモデルをロード
model = YOLO("yolov8n.pt")

# 画像を解析(★★ファイルの場所はご自身の環境に合わせて書き換えて下さい)
results = model.predict("p:/yolo_sample2.png", save=True)

# 検出結果の画像を取得
result_img = results[0].plot()  # 検出結果を画像に描画

# 画像を表示(手動で閉じるまで表示)
cv2.imshow("YOLO Detection", result_img)
cv2.waitKey(0)  # キー入力を待つ(ウィンドウが閉じない)
cv2.destroyAllWindows()  # ウィンドウを閉じる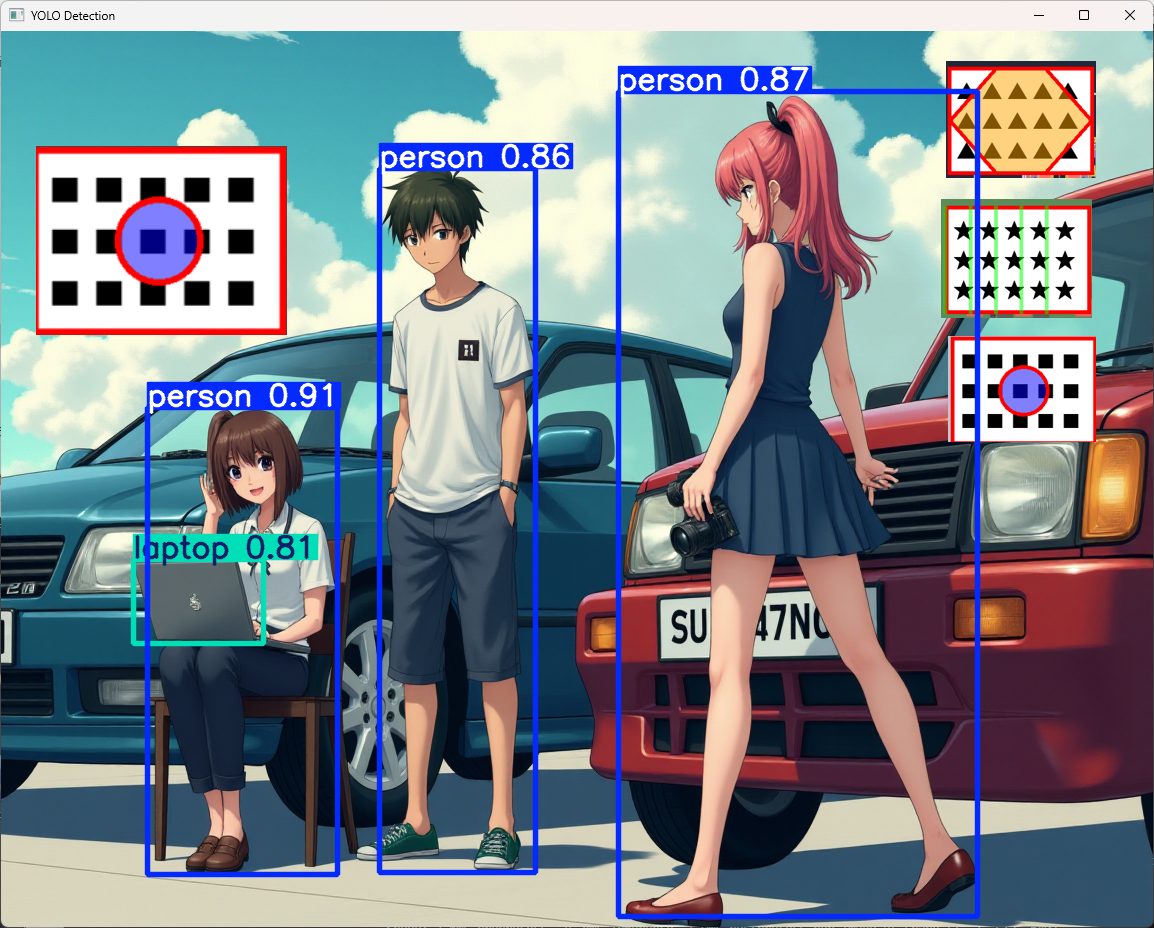
今回学習させたモデルを使った結果、学習させた画像を認識することができました。
from ultralytics import YOLO
import cv2  # OpenCV を使用

# YOLOv8 のモデルをロード
model = YOLO(r"P:\DataAnalysis\src\runs\detect\train\weights\best.pt")

# 画像を解析(★★ファイルの場所はご自身の環境に合わせて書き換えて下さい)
results = model.predict("p:/yolo_sample2.png", save=True)

# 検出結果の画像を取得
result_img = results[0].plot()  # 検出結果を画像に描画

# 画像を表示(手動で閉じるまで表示)
cv2.imshow("YOLO Detection", result_img)
cv2.waitKey(0)  # キー入力を待つ(ウィンドウが閉じない)
cv2.destroyAllWindows()  # ウィンドウを閉じる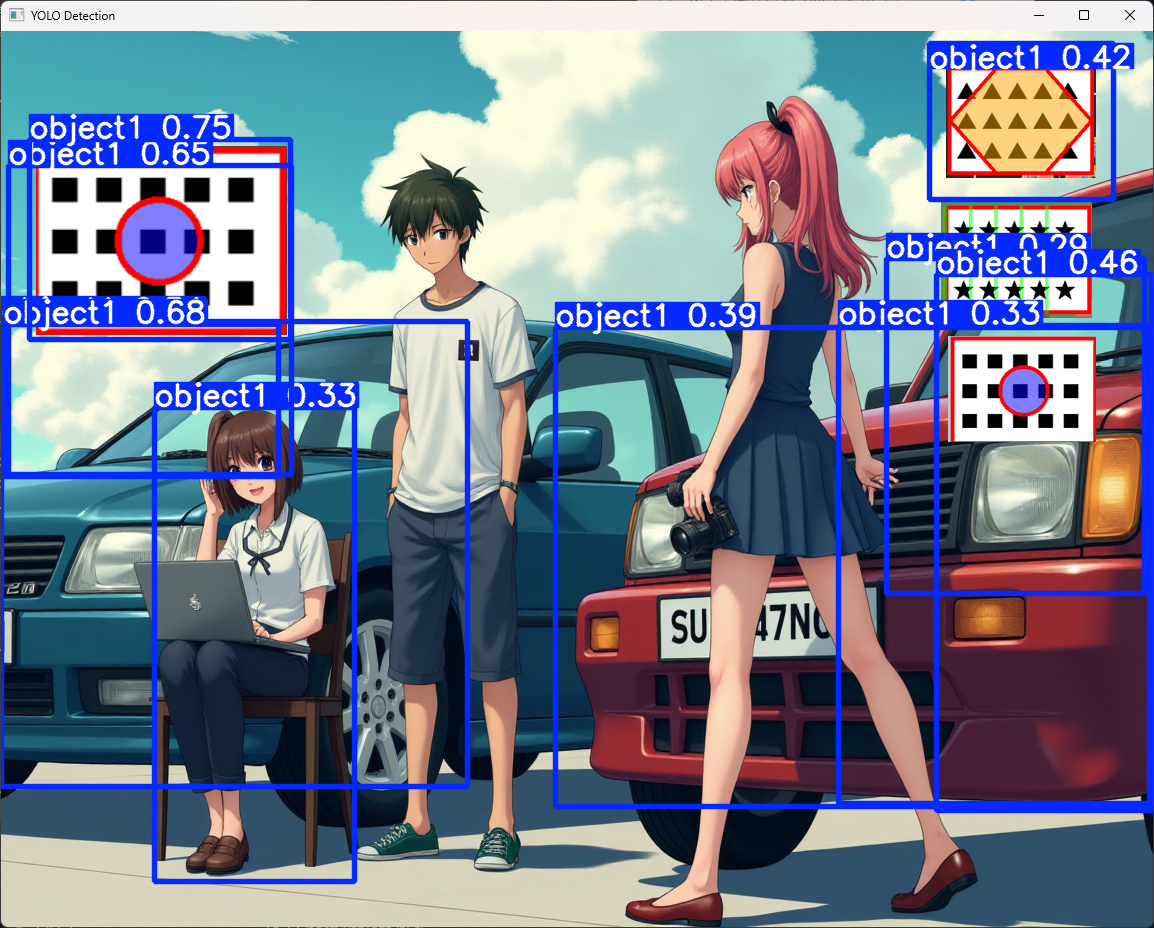
学習を補助するツール
ObjectDetector(物体検出が簡単になるクラス)
物体検出を手軽にするための自作クラス ObjectDetectorを使った物体検出のサンプルプログラムです。
# クラスのインスタンスを生成
detector = ObjectDetector()

# 指定した画像から物体を検出。信頼度閾値を None に設定 (デフォルトを使用)
detector.detect(r'P:\yolo_sample1.png', confidence_threshold=None)

print("検出されたオブジェクト一覧")
if detector.detected_objects_info:
    for obj in detector.detected_objects_info:
        print(f"  クラス: {obj['class_name']}, 信頼度: {obj['confidence']:.2f}, 座標: {obj['coordinates']}")
else:
    print("  物体は検出されませんでした。")

# 検出された人を線で囲む
output_image_person = detector.draw_boxes(target_class='person', color=(0, 0, 255), thickness=3)
# 検出された人がいれば、画像を表示
if output_image_person is not None:
    detector.show('Detected Persons', output_image_person)
    detector.save(output_image_person, 'detected_persons.jpg')

# 検出された車を線で囲む
output_image_car = detector.draw_boxes(target_class='car', color=(255, 0, 0))
# 検出された車があれば、画像を表示
if output_image_cup is not None:
    detector.show('Detected Cars', output_image_car)
detector.save(output_image_car, 'detected_carss.jpg')ObjectDetectorには次のメソッドが用意されています。プログラムはコピペでお使いいただけます。
| メソッド名 | 概要 | 引数 | 戻り値 |
|---|---|---|---|
| __init__( model_path='yolov8n.pt' ) | YOLOv8モデルをロードし、クラス名を取得 | model_path (YOLOモデルのパス, デフォルト: 'yolov8n.pt') | なし |
| detect( image_path, confidence_threshold=None ) | 画像内の物体を検出し、クラス名・信頼度・座標を取得 | image_path (画像パス), confidence_threshold (信頼度閾値, デフォルト: None) | 検出オブジェクトのリスト |
| draw_boxes( target_class, color=(0, 255, 0), thickness=2 ) | 検出画像に四角形を描画 | target_class (描画対象のクラス名), color (矩形の色), thickness (線の太さ) | 描画後の画像 |
| show( window_name, image, max_width=800, max_height=600 ) | 画像をリサイズして画面中央に表示 | window_name (ウィンドウ名), image (表示画像), max_width, max_height (最大サイズ) | なし |
| save( image, save_path='detected_image.jpg' ) | 検出結果の画像をファイルに保存 | image (保存する画像), save_path (保存先のファイル名) | True (成功) / False (失敗) |
# pip install torch torchvision torchaudio --index-url https://download.pytorch.org/whl/cu118
# pip install ultralytics
# pip install Pillow opencv-python
import cv2 # OpenCVライブラリをインポート (画像処理)
from ultralytics import YOLO # UltralyticsのYOLOモデルをインポート (物体検出)
import os # osモジュールをインポート (ファイルパス操作など)
class ObjectDetector:
"""
YOLOv8モデルを使用して物体検出を行うクラス。
"""
def __init__(self, model_path='yolov8n.pt'):
"""
物体検出モデルを初期化します。
Args:
model_path (str, optional): YOLOモデルのパス. デフォルトは 'yolov8n.pt'。
"""
self.model = YOLO(model_path) # YOLOモデルをロード
self.class_names = self.model.names # モデルが検出できるクラス名を取得
self.original_image = None # 検出対象のオリジナル画像を保持
self.detected_objects_info = [] # 検出されたオブジェクトの情報を保持
def detect(self, image_path, confidence_threshold=None):
"""
指定された画像内の物体を検出します。検出結果と元の画像をselfで保持します。
Args:
image_path (str): 検出を行う画像のパス。
confidence_threshold (float, optional): 信頼度の閾値 (0から1). Noneの場合はモデルのデフォルトを使用.
Returns:
list: 検出されたオブジェクトのリスト(クラス名、信頼度、座標)。
"""
self.original_image = cv2.imread(image_path) # OpenCVで画像を読み込む (BGR形式)
results = self.model(image_path, conf=confidence_threshold) # YOLOモデルで推論を実行
# conf: 信頼度閾値 (float, 0から1). この閾値より低い信頼度の検出はフィルタリングされる。
# None を指定すると、モデルのデフォルトの閾値が使用される。
self.detected_objects_info = []
if isinstance(results, list) and len(results) > 0:
result = results[0] # 複数の画像が入力された場合でも、最初の画像の結果を使用
elif not isinstance(results, list):
result = results
else:
return self.detected_objects_info # 物体が検出されなかった場合は空のリストを返す
boxes = result.boxes # 検出されたバウンディングボックスの情報 (ultralytics.engine.results.Boxes オブジェクト)
confidences = boxes.conf.cpu().numpy() # 信頼度スコアをPyTorchテンソルからNumPy配列に変換 (CPU上へ移動)
class_ids = boxes.cls.cpu().numpy().astype(int) # クラスIDをPyTorchテンソルからNumPy配列に変換 (CPU上へ移動し、整数型に変換)
coordinates = boxes.xyxy.cpu().numpy().astype(int).tolist() # バウンディングボックスの左上と右下の座標 [x1, y1, x2, y2] をPyTorchテンソルからNumPy配列に変換し、Pythonのリストに変換 (CPU上へ移動し、整数型に変換)
for i in range(len(boxes)):
class_name = self.class_names[class_ids[i]] # クラスIDからクラス名を取得 (モデルの self.names 属性を使用)
confidence = float(confidences[i]) # 信頼度をfloat型に変換
detection = {
'class_name': class_name,
'confidence': confidence,
'coordinates': coordinates[i]
}
self.detected_objects_info.append(detection)
return self.detected_objects_info
def draw_boxes(self, target_class, color=(0, 255, 0), thickness=2):
"""
selfで保持している画像内の指定したクラスの物体に四角形を描画します。
Args:
target_class (str): 描画したい物体のクラス名。
color (tuple, optional): 四角形の色 (BGR形式). デフォルトは緑色 (0, 255, 0)。
thickness (int, optional): 四角形の線の太さ. デフォルトは 2。
Returns:
numpy.ndarray or None: 四角形が描画された画像 (BGR形式)。
画像がself.original_imageに保持されていない場合は None を返します。
"""
if self.original_image is None:
print("エラー: 画像がまだ読み込まれていません。detect_objects() を先に実行してください。")
return None
output_image = self.original_image.copy() # 元の画像をコピーして描画することで、元の画像を保持
for obj_info in self.detected_objects_info:
if obj_info['class_name'] == target_class:
x1, y1, x2, y2 = obj_info['coordinates']
cv2.rectangle(output_image, (x1, y1), (x2, y2), color, thickness) # OpenCVの rectangle 関数で矩形を描画
# cv2.rectangle(img, pt1, pt2, color[, thickness[, lineType[, shift]]])
# img: 画像
# pt1: 矩形の左上の頂点
# pt2: 矩形の右下の頂点
# color: 矩形の色 (BGRタプル)
# thickness: 矩線の太さ (負の値は塗りつぶし)
# lineType: 矩線の種類
# shift: 座標の小数点以下のビット数
return output_image
def show(self, window_name, image, max_width=800, max_height=600):
"""
画像を指定の最大サイズに収まるようにリサイズして表示し、画面中央に配置する。
Args:
window_name (str): 表示するウィンドウの名前。
image (numpy.ndarray): 表示する画像 (BGR形式)。
max_width (int, optional): リサイズ後の最大幅. デフォルトは 800。
max_height (int, optional): リサイズ後の最大高. デフォルトは 600。
"""
if image is None:
print(f"エラー: 表示する画像がありません ({window_name})。")
return
h, w = image.shape[:2] # 画像の高さと幅を取得 (numpy配列のshape属性)
if w > max_width or h > max_height:
scale_width = max_width / w
scale_height = max_height / h
scale = min(scale_width, scale_height) # 縮小率を計算 (縦横比を維持)
new_width = int(w * scale)
new_height = int(h * scale)
resized_image = cv2.resize(image, (new_width, new_height), interpolation=cv2.INTER_LANCZOS4) # OpenCVの resize 関数で画像をリサイズ
# cv2.resize(src, dsize[, dst[, fx[, fy[, interpolation]]]])
# src: 入力画像
# dsize: 出力画像のサイズ (width, height)
# fx, fy: 水平方向と垂直方向のスケールファクタ
# interpolation: 補間方法 (cv2.INTER_LANCZOS4 は高品質な縮小に使用されることが多い)
else:
resized_image = image
cv2.namedWindow(window_name, cv2.WINDOW_NORMAL) # 名前付きウィンドウを作成 (サイズ変更可能)
cv2.resizeWindow(window_name, resized_image.shape[1], resized_image.shape[0]) # ウィンドウをリサイズ後の画像サイズに調整
screen_width = 1920 # あなたの画面の幅に合わせてください (ピクセル単位)
screen_height = 1080 # あなたの画面の高さに合わせてください (ピクセル単位)
window_width = resized_image.shape[1]
window_height = resized_image.shape[0]
pos_x = int((screen_width - window_width) / 2) # ウィンドウを画面中央に配置するためのX座標を計算
pos_y = int((screen_height - window_height) / 2) # ウィンドウを画面中央に配置するためのY座標を計算
cv2.moveWindow(window_name, pos_x, pos_y) # OpenCVの moveWindow 関数でウィンドウを移動
# cv2.moveWindow(winname, x, y)
# winname: ウィンドウの名前
# x: ウィンドウの左上のx座標
# y: ウィンドウの左上のy座標
cv2.imshow(window_name, resized_image) # OpenCVの imshow 関数で画像を表示
# cv2.imshow(winname, mat)
# winname: ウィンドウの名前
# mat: 表示する画像 (numpy配列)
cv2.waitKey(0) # キーが押されるまでウィンドウを待機 (0 は無限に待機)
cv2.destroyAllWindows() # 全てのOpenCVウィンドウを閉じる
def save(self, image, save_path='detected_image.jpg'):
"""
検出結果が描画された画像をファイルに保存する。
Args:
image (numpy.ndarray): 保存する画像 (BGR形式)。
save_path (str, optional): 保存先のファイルパス. デフォルトは 'detected_image.jpg'。
Returns:
bool: 保存に成功した場合は True, 失敗した場合は False。
"""
if image is None:
print("エラー: 保存する画像がありません。")
return False
try:
cv2.imwrite(save_path, image) # OpenCVの imwrite 関数で画像を保存
# cv2.imwrite(filename, img[, params])
# filename: 保存先のファイル名
# img: 保存する画像
# params: 保存時のオプション
print(f"検出結果を {save_path} に保存しました。")
return True
except Exception as e:
print(f"画像の保存に失敗しました: {e}")
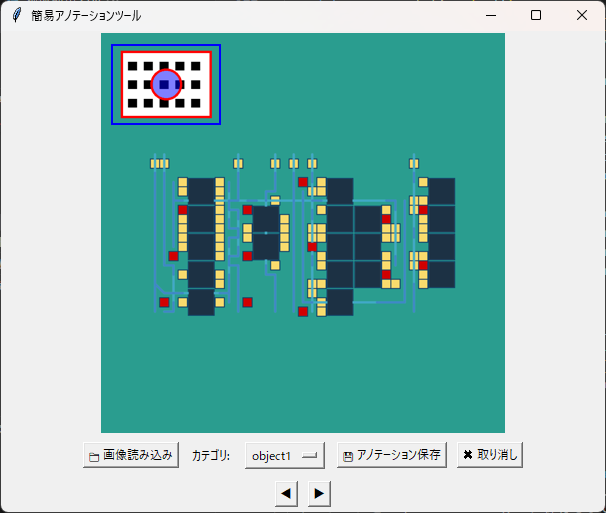
return FalseAnnotationTool(簡易アノテーションツール)
プログラムはコピペするだけで実行できますが、__main__ 処理の下記行はご自身の環境にあわせて修正してください。
categories = ["object1", "object2", "other"] # ラベル名(先頭からクラスID=0,クラスID=1,・・・)
ox_color = "blue" # バウンディングボックスの色
box_thickness = 2 # バウンディングボックスの太さ
import tkinter as tk
from tkinter import filedialog
from PIL import Image, ImageTk
import os
import glob

class AnnotationTool:
    def __init__(self, root, categories, box_color="red", box_thickness=1):
        self.root = root
        self.root.title("簡易アノテーションツール")

        self.image_path = None
        self.original_image = None
        self.photo = None
        self.canvas = tk.Canvas(self.root, width=600, height=400)
        self.canvas.pack(fill=tk.BOTH, expand=True)
        self.canvas.bind("<Configure>", self.on_resize)

        self.rect_start_x_scaled = None
        self.rect_start_y_scaled = None
        self.current_rect = None
        self.annotations = []
        self.image_annotations = {}     # 画像パスをキーとしたアノテーション辞書
        self.scale_x = 1.0
        self.scale_y = 1.0
        self.offset_x = 0
        self.offset_y = 0
        self.image_displayed = False # 画像が表示されているかどうかを追跡
        self.image_file_list = []
        self.current_image_index = 0

        self.categories = categories
        self.selected_category = tk.StringVar(self.root)
        self.selected_category.set(self.categories[0] if self.categories else "") # デフォルト値を設定
        self.box_color = box_color
        self.box_thickness = box_thickness

        button_frame = tk.Frame(self.root)
        button_frame.pack(pady=5)
        self.load_button = tk.Button(self.root, text="📁 画像読み込み", command=self.load_image)
        self.load_button.pack(in_=button_frame, side=tk.LEFT, padx=5)
        self.class_label = tk.Label(self.root, text="カテゴリ:")
        self.class_label.pack(in_=button_frame, side=tk.LEFT, padx=5)
        self.class_dropdown = tk.OptionMenu(self.root, self.selected_category, *self.categories)
        self.class_dropdown.pack(in_=button_frame, side=tk.LEFT, padx=5)
        self.save_button = tk.Button(self.root, text="💾 アノテーション保存", command=self.save_annotations)
        self.save_button.pack(in_=button_frame, side=tk.LEFT, padx=5)
        self.undo_button = tk.Button(self.root, text="✖ 取り消し", command=self.undo_annotation)
        self.undo_button.pack(in_=button_frame, side=tk.LEFT, padx=5)

        navigation_frame = tk.Frame(self.root)
        navigation_frame.pack(pady=5)
        self.prev_button = tk.Button(self.root, text="◀", command=self.load_previous_image)
        self.prev_button.pack(in_=navigation_frame, side=tk.LEFT, padx=5)
        self.next_button = tk.Button(self.root, text="▶", command=self.load_next_image)
        self.next_button.pack(in_=navigation_frame, side=tk.LEFT, padx=5)

        self.canvas.bind("<ButtonPress-1>", self.start_draw)
        self.canvas.bind("<B1-Motion>", self.draw_rect)
        self.canvas.bind("<ButtonRelease-1>", self.end_draw)

    def load_image(self):
        file_path = filedialog.askopenfilename(
            defaultextension=".png",
            filetypes=[("画像ファイル", "*.png;*.jpg;*.jpeg;*.gif;*.bmp;*.tif")]
        )
        if file_path:
            self.image_path = file_path
            self.original_image = Image.open(file_path)
            self.resize_image()
            self.load_annotations() # アノテーションをロード
            self.image_displayed = True
            self.load_image_list()
            self.update_navigation_button_state()
        else:
            self.image_displayed = False

    def load_annotations(self):
        if self.image_path:
            if self.image_path in self.image_annotations:
                self.annotations = list(self.image_annotations[self.image_path]) # コピーを作成
            else:
                self.annotations = []
            self.redraw_annotations()

    def save_current_annotations(self):
        if self.image_path:
            self.image_annotations[self.image_path] = list(self.annotations) # コピーを保存

    def load_image_list(self):
        if self.image_path:
            image_dir = os.path.dirname(self.image_path)
            extensions = ['*.png', '*.jpg', '*.jpeg', '*.gif', '*.bmp', '*.tif']
            self.image_file_list = []
            for ext in extensions:
                self.image_file_list.extend(glob.glob(os.path.join(image_dir, ext)))
            self.image_file_list.sort()
            try:
                self.current_image_index = self.image_file_list.index(self.image_path)
            except ValueError:
                self.current_image_index = 0
        else:
            self.image_file_list = []
            self.current_image_index = 0

    def load_previous_image(self):
        self.save_current_annotations() # 現在の画像を保存
        if self.image_file_list:
            self.current_image_index -= 1
            if self.current_image_index < 0:
                self.current_image_index = len(self.image_file_list) - 1
            self.load_current_image()

    def load_next_image(self):
        self.save_current_annotations() # 現在の画像を保存
        if self.image_file_list:
            self.current_image_index += 1
            if self.current_image_index >= len(self.image_file_list):
                self.current_image_index = 0
            self.load_current_image()

    def load_current_image(self):
        if self.image_file_list:
            self.image_path = self.image_file_list[self.current_image_index]
            try:
                self.original_image = Image.open(self.image_path)
                self.resize_image()
                self.load_annotations() # アノテーションをロード
                self.image_displayed = True
                self.update_navigation_button_state()
            except Exception as e:
                print(f"画像の読み込みに失敗: {e}")
                self.original_image = None
                self.photo = None
                self.image_displayed = False
                self.canvas.delete("all")
                self.update_navigation_button_state()
        else:
            self.original_image = None
            self.photo = None
            self.image_displayed = False
            self.canvas.delete("all")
            self.update_navigation_button_state()

    def update_navigation_button_state(self):
        if len(self.image_file_list) <= 1:
            self.prev_button.config(state=tk.DISABLED)
            self.next_button.config(state=tk.DISABLED)
        else:
            self.prev_button.config(state=tk.NORMAL)
            self.next_button.config(state=tk.NORMAL)

    def resize_image(self, event=None):
        self.canvas.delete("all") # Canvas上の全てのアイテムを削除
        self.photo = None # PhotoImageオブジェクトも削除
        if self.original_image:
            original_width, original_height = self.original_image.size
            canvas_width = self.canvas.winfo_width()
            canvas_height = self.canvas.winfo_height()

            aspect_ratio = original_width / original_height

            if canvas_width / canvas_height > aspect_ratio:
                display_height = canvas_height
                display_width = int(display_height * aspect_ratio)
                self.offset_x = (canvas_width - display_width) // 2
                self.offset_y = 0
            else:
                display_width = canvas_width
                display_height = int(display_width / aspect_ratio)
                self.offset_x = 0
                self.offset_y = (canvas_height - display_height) // 2

            self.scale_x = display_width / original_width
            self.scale_y = display_height / original_height
            self.scale = min(self.scale_x, self.scale_y)

            self.resized_image = self.original_image.resize((display_width, display_height))
            self.photo = ImageTk.PhotoImage(self.resized_image)

            self.canvas.create_image(self.offset_x, self.offset_y, anchor=tk.NW, image=self.photo, tags="image_display")
            self.redraw_annotations() # 画像リサイズ後、アノテーションを再描画
            self.image_displayed = True
        else:
            self.scale_x = 1.0
            self.scale_y = 1.0
            self.offset_x = 0
            self.offset_y = 0
            self.image_displayed = False

    def on_resize(self, event):
        self.resize_image(event)

    def draw_annotation_rect(self, annotation):
        x1_orig, y1_orig, x2_orig, y2_orig = annotation['bbox']
        x1_scaled = int(x1_orig * self.scale_x + self.offset_x)
        y1_scaled = int(y1_orig * self.scale_y + self.offset_y)
        x2_scaled = int(x2_orig * self.scale_x + self.offset_x)
        y2_scaled = int(y2_orig * self.scale_y + self.offset_y)
        self.canvas.create_rectangle(x1_scaled, y1_scaled, x2_scaled, y2_scaled,
                                       outline=self.box_color, width=self.box_thickness, tags="annotation_rect")

    def redraw_annotations(self):
            self.canvas.delete("all") # 古い描画を全て削除
            if self.photo:
                self.canvas.create_image(self.offset_x, self.offset_y, anchor=tk.NW, image=self.photo, tags="image_display")
            for annotation in self.annotations:
                self.draw_annotation_rect(annotation)

    def is_point_in_image(self, x, y):
        if not self.original_image:
            return False
        return (self.offset_x <= x <= self.offset_x + self.resized_image.width and
                self.offset_y <= y <= self.offset_y + self.resized_image.height)

    def start_draw(self, event):
        if self.original_image and self.scale_x > 0 and self.scale_y > 0 and self.is_point_in_image(event.x, event.y):
            self.rect_start_x_scaled = event.x
            self.rect_start_y_scaled = event.y
            self.current_rect = self.canvas.create_rectangle(
                event.x, event.y, event.x, event.y, outline=self.box_color, width=self.box_thickness
            )
        else:
            self.rect_start_x_scaled = None
            self.rect_start_y_scaled = None

    def draw_rect(self, event):
        if self.current_rect:
            self.canvas.coords(self.current_rect, self.rect_start_x_scaled, self.rect_start_y_scaled, event.x, event.y)

    def end_draw(self, event):
        if self.current_rect and self.original_image and self.scale_x > 0 and self.scale_y > 0:
            x1_scaled = min(self.rect_start_x_scaled, event.x)
            y1_scaled = min(self.rect_start_y_scaled, event.y)
            x2_scaled = max(self.rect_start_x_scaled, event.x)
            y2_scaled = max(self.rect_start_y_scaled, event.y)

            original_x1 = int((x1_scaled - self.offset_x) / self.scale_x)
            original_y1 = int((y1_scaled - self.offset_y) / self.scale_y)
            original_x2 = int((x2_scaled - self.offset_x) / self.scale_x)
            original_y2 = int((y2_scaled - self.offset_y) / self.scale_y)

            width_orig = abs(original_x2 - original_x1)
            height_orig = abs(original_y2 - original_y1)

            if width_orig > 5 and height_orig > 5:
                category_name = self.selected_category.get()
                annotation = {
                    "image_path": self.image_path,
                    "bbox": (original_x1, original_y1, original_x2, original_y2),
                    "category_name": category_name
                }
                self.annotations.append(annotation)
            else:
                self.canvas.delete(self.current_rect)

            self.current_rect = None
            self.rect_start_x_scaled = None
            self.rect_start_y_scaled = None
            self.redraw_annotations() # アノテーション確定後に再描画

    def undo_annotation(self):
        # 現在描画中の矩形があれば削除
        if self.current_rect:
            self.canvas.delete(self.current_rect)
            self.current_rect = None
            self.rect_start_x_scaled = None
            self.rect_start_y_scaled = None
            return # 描画途中なので、既存のアノテーションは取り消さない

        if self.annotations:
            # アノテーションリストから最後の要素を削除
            removed_annotation = self.annotations.pop()
            print(f"アノテーション取り消し: {removed_annotation}")
            self.redraw_annotations() # 残りのアノテーションを再描画

    def save_annotations(self):
            self.save_current_annotations() # ★ 現在の画像を保存
            output_dir = filedialog.askdirectory(title="YOLO アノテーションの保存先フォルダを選択")
            if output_dir:
                for image_path, annotations in self.image_annotations.items():
                    if annotations:  # ★ アノテーションリストが空でない場合のみ処理
                        image = Image.open(image_path)
                        image_width, image_height = image.size
                        base_name = os.path.splitext(os.path.basename(image_path))[0]
                        output_path = os.path.join(output_dir, f"{base_name}.txt")

                        with open(output_path, 'w') as f:
                            for annotation in annotations:
                                bbox = annotation['bbox']
                                category_name = annotation['category_name']

                                try:
                                    class_id = self.categories.index(category_name)
                                except ValueError:
                                    print(f"警告: カテゴリ '{category_name}' は categories リストに存在しません。スキップします。")
                                    continue

                                x_min, y_min, x_max, y_max = bbox
                                width_abs = x_max - x_min
                                height_abs = y_max - y_min
                                x_center_abs = (x_min + x_max) / 2
                                y_center_abs = (y_min + y_max) / 2

                                x_center_rel = x_center_abs / image_width
                                y_center_rel = y_center_abs / image_height
                                width_rel = width_abs / image_width
                                height_rel = height_abs / image_height

                                f.write(f"{class_id} {x_center_rel:.6f} {y_center_rel:.6f} {width_rel:.6f} {height_rel:.6f}\n")
                    else:
                        base_name = os.path.splitext(os.path.basename(image_path))[0]
                        output_path = os.path.join(output_dir, f"{base_name}.txt")
                        with open(output_path, 'w') as f:
                            pass
                        print(f"警告: アノテーションがないため、空のファイル '{output_path}' を保存しました。")
                print(f"YOLO アノテーションを {output_dir} に保存しました。")

if __name__ == "__main__":
    categories = ["object1", "object2", "other"] # ラベル名(先頭からクラスID=0,クラスID=1,・・・)
    box_color = "blue" # バウンディングボックスの色
    box_thickness = 2 # バウンディングボックスの太さ
    root = tk.Tk()
    app = AnnotationTool(root, categories, box_color, box_thickness)
    root.mainloop()
アノテーション結果を保存すると、アノテーションした画像に対応したテキストファイルが自動で生成されます。
split_dataset(アノテーション結果から、学習・検証データとYAMLを作成)
これらの作業を簡単に済ませるための簡易ツールを作成しました。画面の指示に従って操作すると、上記のフォルダ構成でファイルを振り分け、YAMLファイルを作成してくれます。
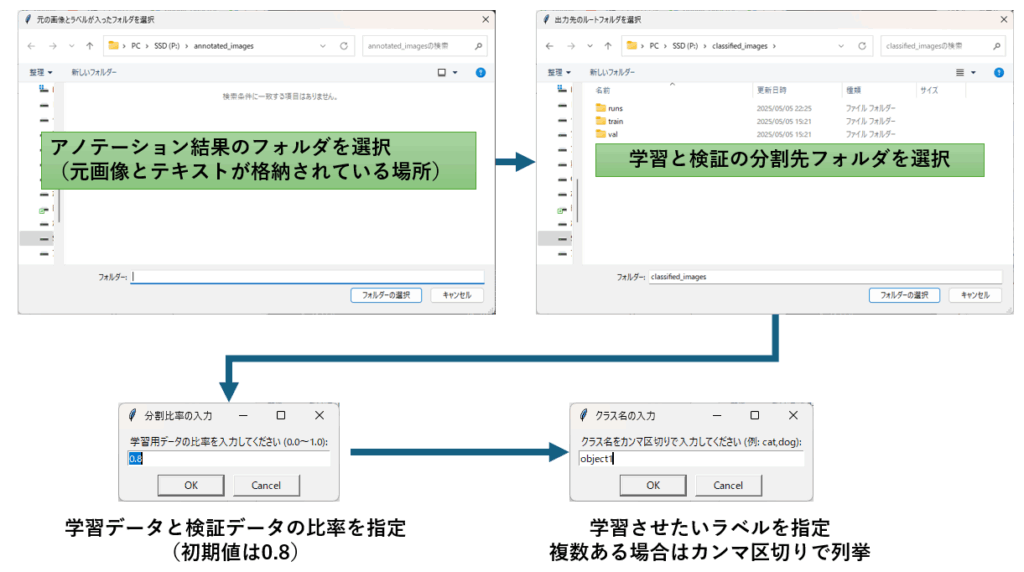
アノテーション結果のフォルダ、分割結果を保存するフォルダ、学習と検証の比率、学習させたいラベルのリストを引数で指定できるplit_dataset関数を作って、簡易ツールはそれを呼び出しているだけなので、関数を直接使っていただいても構いません。
import os
import glob
import random
import shutil
from tkinter import filedialog, simpledialog, Tk

def split_dataset(input_dir, output_root_dir, train_ratio=0.8, class_names=None):
    """
    指定した入力元フォルダ内の画像とラベルファイルを、
    指定した比率で学習用と検証用のフォルダに出力先フォルダに振り分け、
    YOLO 設定ファイル (.yaml) を作成します。

    Args:
        input_dir (str): 元の画像とラベルが入ったフォルダのパス。
        output_root_dir (str): 出力先のルートフォルダのパス。
        train_ratio (float): 学習用データの比率 (0.0〜1.0)。検証用は 1.0 - train_ratio。
        class_names (list, optional): クラス名のリスト。None の場合はデフォルトを使用。
    """
    if not os.path.isdir(input_dir):
        print(f"エラー: 入力元のフォルダ '{input_dir}' は存在しません。")
        return

    print(f"入力元フォルダ: {input_dir}")
    print(f"出力先ルートフォルダ: {output_root_dir}")
    print(f"学習用データの比率: {train_ratio:.2f}")

    image_extensions = ['*.jpg', '*.jpeg', '*.png', '*.gif', '*.bmp', '*.tif']
    image_files = []
    for ext in image_extensions:
        image_files.extend(glob.glob(os.path.join(input_dir, ext)))

    data_pairs = []
    for image_file in image_files:
        base_name = os.path.splitext(os.path.basename(image_file))[0]
        label_file = os.path.join(input_dir, f"{base_name}.txt")
        if os.path.exists(label_file):
            data_pairs.append((image_file, label_file))
        else:
            print(f"警告: 対応するラベルファイルが見つかりませんでした: {label_file}")

    random.shuffle(data_pairs)
    num_total = len(data_pairs)
    num_train = int(num_total * train_ratio)

    train_pairs = data_pairs[:num_train]
    val_pairs = data_pairs[num_train:]

    # 出力フォルダの作成
    train_image_dir = os.path.join(output_root_dir, 'train', 'images')
    train_label_dir = os.path.join(output_root_dir, 'train', 'labels')
    val_image_dir = os.path.join(output_root_dir, 'val', 'images')
    val_label_dir = os.path.join(output_root_dir, 'val', 'labels')

    os.makedirs(train_image_dir, exist_ok=True)
    os.makedirs(train_label_dir, exist_ok=True)
    os.makedirs(val_image_dir, exist_ok=True)
    os.makedirs(val_label_dir, exist_ok=True)

    def copy_files(pairs, image_dst_dir, label_dst_dir):
        for image_src, label_src in pairs:
            image_dst = os.path.join(image_dst_dir, os.path.basename(image_src))
            label_dst = os.path.join(label_dst_dir, os.path.basename(label_src))
            try:
                shutil.copy2(image_src, image_dst)
                shutil.copy2(label_src, label_dst)
            except Exception as e:
                print(f"ファイルのコピー中にエラーが発生しました: {e}")

    print("学習用データのコピーを開始...")
    copy_files(train_pairs, train_image_dir, train_label_dir)
    print(f"学習用データを '{train_image_dir}' および '{train_label_dir}' にコピーしました ({len(train_pairs)}件)。")

    print("検証用データのコピーを開始...")
    copy_files(val_pairs, val_image_dir, val_label_dir)
    print(f"検証用データを '{val_image_dir}' および '{val_label_dir}' にコピーしました ({len(val_pairs)}件)。")

    # YOLO 設定ファイル (.yaml) の作成
    yaml_path = os.path.join(output_root_dir, 'dataset.yaml')
    if class_names is None:
        class_names = ['object']  # デフォルトのクラス名
        print("警告: クラス名が指定されていません。デフォルトの ['object'] を使用します。")

    num_classes = len(class_names)

    yaml_content = f"""
    train: {os.path.join(output_root_dir, 'train', 'images')}
    val: {os.path.join(output_root_dir, 'val', 'images')}
    nc: {num_classes}
    names: {class_names}
    """

    with open(yaml_path, 'w') as f:
        f.write(yaml_content)

    print(f"YOLO 設定ファイル (.yaml) を '{yaml_path}' に作成しました。")

def split_dataset_gui():
    """
    GUIを通じてデータセットの分割に必要な情報を取得し、split_dataset 関数を呼び出します。
    """
    root = Tk()
    root.withdraw()  # メインウィンドウを表示しない

    # 入力元フォルダの選択
    input_dir = filedialog.askdirectory(title="元の画像とラベルが入ったフォルダを選択")
    if not input_dir:
        print("入力元のフォルダが選択されませんでした。")
        return

    # 出力先フォルダの選択
    output_root_dir = filedialog.askdirectory(title="出力先のルートフォルダを選択")
    if not output_root_dir:
        print("出力先のルートフォルダが選択されませんでした。")
        return

    # 分割比率の入力
    train_ratio_str = simpledialog.askstring("分割比率の入力", "学習用データの比率を入力してください (0.0〜1.0):", parent=root, initialvalue="0.8")
    if train_ratio_str is None:
        print("分割比率が入力されませんでした。")
        return

    try:
        train_ratio = float(train_ratio_str)
        if not 0.0 <= train_ratio <= 1.0:
            print("無効な分割比率です。0.0〜1.0 の範囲で入力してください。")
            return
    except ValueError:
        print("無効な分割比率です。数値を入力してください。")
        return

    # クラス名の入力
    class_names_str = simpledialog.askstring("クラス名の入力", "クラス名をカンマ区切りで入力してください (例: cat,dog):", parent=root)
    if class_names_str is None:
        class_names = ['object']
        print("クラス名が入力されませんでした。デフォルトの ['object'] を使用します。")
    else:
        class_names = [name.strip() for name in class_names_str.split(',')]

    split_dataset(input_dir, output_root_dir, train_ratio, class_names)
    print("データセットの分割と YOLO 設定ファイルの作成が完了しました。")

if __name__ == '__main__':
    split_dataset_gui()
YOLOTrainer(学習と検証が簡単になるクラス)
学習と検証が簡単に実行できるようにYOLOTrainerクラスを作りました。また、モデルをはじめとする成果物はカレントフォルダに生成されるため、学習&検証が完了した時点で指定フォルダにコピーするメソッドも用意しました。
| メソッド名 | 概要 | 引数 | 戻り値 |
|---|---|---|---|
| __init__( data_yaml_path, model_name='yolov8n.pt') | YOLO モデルをロードし、学習に必要なデータを設定する。 | data_yaml_path (データセットの設定ファイルのパス), model_name (YOLOモデルの名前, デフォルト: 'yolov8n.pt') | なし |
| load( model_path=None ) | 指定したモデルをロードする。 | model_path (使用する .pt モデルのパス, デフォルト: None) | なし |
| train( epochs=100, batch=16, imgsz=640, name='yolo_training' ) | YOLO モデルの学習を実行する。 | epochs (学習回数, デフォルト: 100), batch (バッチサイズ, デフォルト: 16), imgsz (画像サイズ, デフォルト: 640), name (学習結果の保存名) | 学習結果 |
| validate( batch=16, imgsz=640, name='yolo_validation' ) | YOLO モデルの評価を実行する。 | batch (バッチサイズ, デフォルト: 16), imgsz (画像サイズ, デフォルト: 640), name (検証結果の保存名) | 検証結果 |
| copy_results( destination_dir=None, is_move=False ) | 学習結果を指定フォルダへコピーまたは移動する。 | destination_dir (保存先フォルダ, デフォルト: None), is_move (True の場合、移動を実行) | なし |
import os
import shutil
from ultralytics import YOLO

class YOLOTrainer:
    def __init__(self, data_yaml_path, model_name='yolov8n.pt'):
        self.data_yaml_path = data_yaml_path
        self.model_name = model_name
        self.model = None
        self.load()

    def load(self, model_path=None):
        """
        YOLO モデルをロードします。

        Args:
            model_path (str, optional): ロードするモデルのパス (.pt ファイル)。
                                         指定がない場合は、__init__ で指定された model_name を使用します。
        """
        try:
            if model_path:
                self.model = YOLO(model_path)
                print(f"モデル '{model_path}' をロードしました。")
            else:
                self.model = YOLO(self.model_name)
                print(f"モデル '{self.model_name}' をロードしました。")
        except Exception as e:
            print(f"モデルのロードに失敗しました: {e}")
            self.model = None

    def train(self, epochs=100, batch=16, imgsz=640, name='yolo_training'):
        if self.model is None:
            print("モデルがロードされていません。")
            return

        try:
            results = self.model.train(data=self.data_yaml_path, epochs=epochs, batch=batch, imgsz=imgsz, name=name)
            print(f"学習が完了しました。結果は runs/detect/{name} フォルダに保存されます。")
            return results
        except Exception as e:
            print(f"学習中にエラーが発生しました: {e}")
            return None

    def validate(self, batch=16, imgsz=640, name='yolo_validation'):
        if self.model is None:
            print("モデルがロードされていません。")
            return

        try:
            results = self.model.val(data=self.data_yaml_path, batch=batch, imgsz=imgsz, name=name)
            print(f"評価が完了しました。結果は runs/detect/{name} フォルダに保存されます。")
            return results
        except Exception as e:
            print(f"学習中にエラーが発生しました: {e}")
            return None

    def copy_results(self, destination_dir=None, is_move=False):
        """
        カレントディレクトリの 'runs' フォルダ全体を
        指定した場所(指定がない場合は yaml ファイルが置かれているフォルダ)に
        名前を変えずにコピーまたは移動します。

        Args:
            destination_dir (str, optional): コピー/移動先のベースフォルダのパス。
                                              指定がない場合は、yaml ファイルが置かれているフォルダを使用します。
            is_move (bool): True の場合、コピーではなく移動を行います。デフォルトは False (コピー)。
        """
        runs_dir = 'runs'
        if os.path.exists(runs_dir) and os.path.isdir(runs_dir):
            if destination_dir is None:
                destination_dir = os.path.dirname(os.path.abspath(self.data_yaml_path))

            destination_runs_dir = os.path.join(destination_dir, 'runs') # コピー/移動先は destination_dir 直下の 'runs' フォルダ
            os.makedirs(destination_dir, exist_ok=True) # コピー/移動先のベースフォルダが存在しない場合は作成

            try:
                if is_move:
                    shutil.move(runs_dir, destination_runs_dir)
                    print(f"フォルダ '{runs_dir}' を '{destination_runs_dir}' に移動しました。")
                else:
                    shutil.copytree(runs_dir, destination_runs_dir)
                    print(f"フォルダ '{runs_dir}' を '{destination_runs_dir}' にコピーしました。")
            except Exception as e:
                operation = "移動" if is_move else "コピー"
                print(f"フォルダ '{runs_dir}' の{operation}に失敗しました: {e}")
                print(e) # エラーの詳細を表示
        else:
            print(f"警告: 'runs' フォルダが見つかりませんでした。")

if __name__ == '__main__':

    # yaml ファイルのパスを指定します。ご自身の環境に書き換えて下さい。
    yaml_path = 'P:/classified_images/dataset.yaml'
    model_name = 'yolov8s.pt'

    trainer = YOLOTrainer(yaml_path, model_name)
    if trainer.model:
        trainer.train(epochs=1, batch=4, imgsz=320, name='default_output_exp')
        trainer.validate(batch=4, imgsz=320, name='default_output_val')
        # yaml ファイルと同じフォルダに移動
        trainer.copy_results(is_move=True)
まとめ
YOLO(You Only Look Once)は、リアルタイム物体検出に優れたディープラーニング技術であり、Ultralytics によって提供されている最新の YOLOv8 は、より高速かつ高精度なモデルとして注目されています。
この記事では、YOLOv8 を使った基本的な物体検出の方法から、独自データを用いた追加学習の手順までを一通り紹介しました。
Ultralytics の Python ライブラリを活用することで、物体検出は非常に簡単かつ柔軟に行えるようになりました。今後は、実際の業務やアプリケーションに応じたモデルのチューニングや、自作データによるファインチューニングにも挑戦してみてください。


コメント